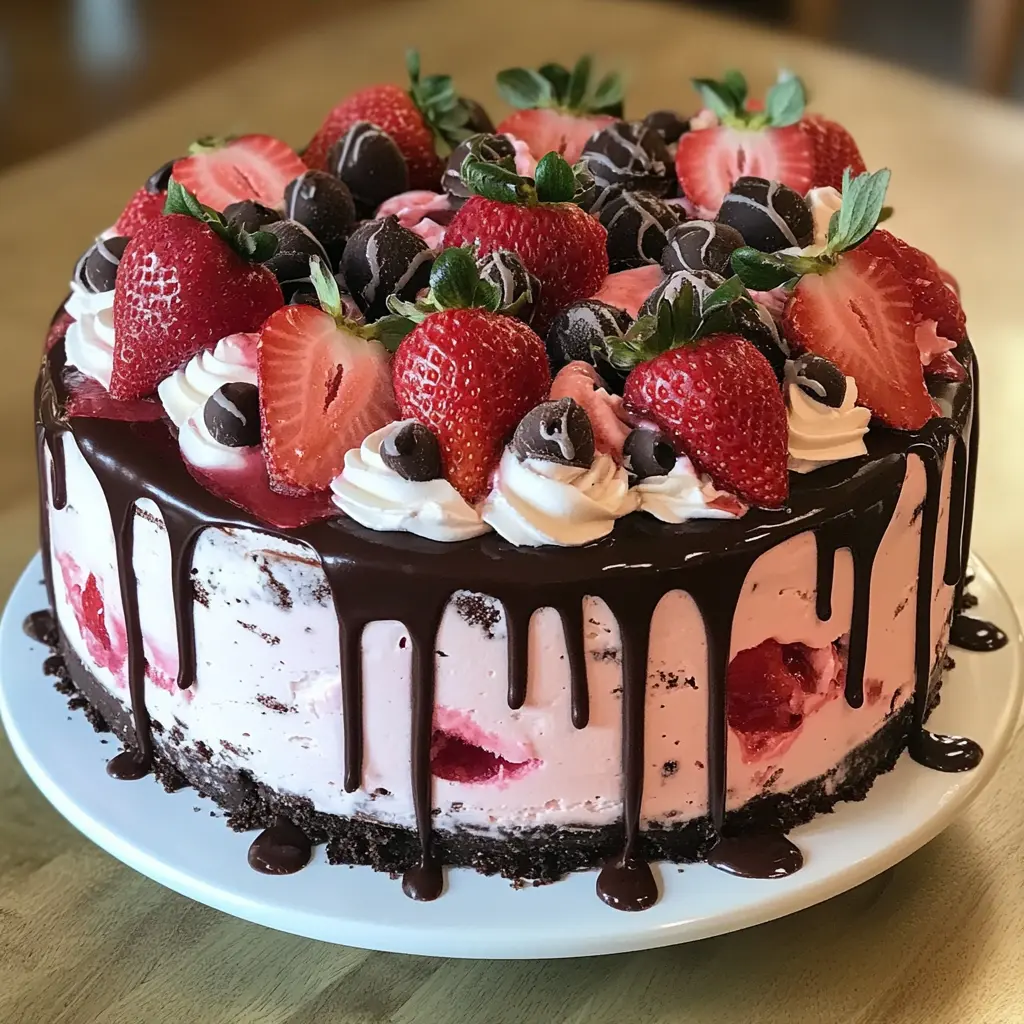
Description of this recipe: This Chocolate Covered Strawberry Ice Cream Cake is a decadent and delightful dessert that perfectly combines the rich flavors of chocolate cake and ganache with the refreshing sweetness of strawberry ice cream and fresh strawberries. It’s a show-stopping treat that’s surprisingly easy to make, perfect for birthdays, celebrations, or any special occasion.
Why you will love this recipe: You’ll adore this recipe because it’s the ultimate indulgence! The moist chocolate cake layers offer a tender base, while the creamy strawberry ice cream provides a cool and fruity contrast. The luscious chocolate ganache adds a layer of rich, intense chocolate flavor that ties everything together beautifully. Plus, the fresh strawberry garnish not only enhances the flavor but also adds a touch of elegance to the presentation. This cake is guaranteed to impress your friends and family, and it’s sure to become a new favorite. It’s customizable, allowing you to choose your favorite flavors, and the step-by-step instructions make it approachable for bakers of all skill levels. Get ready to wow everyone with this stunning and delicious creation!
Introduction
The combination of chocolate and strawberries is a classic for a reason – the rich, dark intensity of chocolate harmonizes perfectly with the bright, sweet tartness of strawberries. This Chocolate Covered Strawberry Ice Cream Cake takes that beloved pairing to the next level, transforming it into a stunning and unforgettable dessert. Imagine slicing into layers of moist, tender chocolate cake, revealing a creamy stratum of strawberry ice cream, all enveloped in a glossy, decadent chocolate ganache. The fresh strawberries on top add a pop of color and a burst of fresh flavor.
This recipe is designed to be approachable and fun. Don’t be intimidated by the multiple components; each element is straightforward and easy to execute. The cake layers can be made in advance, as can the ganache. The assembly is the most exciting part, and the final result is a masterpiece that’s worth every bit of effort. Whether you’re celebrating a birthday, anniversary, or simply want to treat yourself and your loved ones to something extraordinary, this Chocolate Covered Strawberry Ice Cream Cake is the perfect choice. It’s a delightful balance of textures and flavors that will leave everyone wanting more. So, grab your ingredients, put on your apron, and let’s create some magic in the kitchen!
Ingredients:
For the Cake Layers:
- 2 cups all-purpose flour: Provides the structure for the cake layers. Make sure to use standard all-purpose flour for the best results.
- 2 cups granulated sugar: Sweetens the cake and contributes to its moist texture.
- ¾ cup unsweetened cocoa powder: Adds the rich, chocolate flavor to the cake. Use a high-quality cocoa powder for a deeper, more intense flavor.
- 1 ½ teaspoons baking powder: Leavening agent that helps the cake rise and become light and fluffy.
- 1 ½ teaspoons baking soda: Another leavening agent that reacts with the cocoa powder to create a light and airy texture.
- 1 teaspoon salt: Enhances the flavors of the other ingredients and balances the sweetness.
- 2 large eggs: Bind the ingredients together and contribute to the cake’s moistness.
- 1 cup whole milk: Adds moisture to the cake and helps create a smooth batter.
- ½ cup vegetable oil: Provides moisture and richness to the cake. You can also use canola oil or melted coconut oil.
- 2 teaspoons vanilla extract: Enhances the flavors of the other ingredients and adds a touch of warmth.
- 1 cup boiling water: Activates the cocoa powder and creates a moister cake.
For the Ice Cream Layers:
- 1.5 quarts strawberry ice cream, softened: The star of the show! Use a high-quality strawberry ice cream for the best flavor. Softening it slightly makes it easier to spread.
For the Chocolate Ganache:
- 1 cup heavy cream: Provides the richness and smoothness for the ganache.
- 12 oz semi-sweet chocolate chips: The base for the ganache. Use a good quality semi-sweet chocolate for a rich and balanced flavor.
For Garnish:
- Fresh strawberries, sliced: Adds a pop of color, freshness, and flavor.
- Chocolate shavings: Enhances the chocolate flavor and adds a decorative touch.
Preparation:
Step 1: Prepare the Cake Layers
- Preheat oven to 350°F (175°C). This is crucial for even baking and proper cake rise. Ensure your oven is accurately calibrated for the best results.
- Grease and flour two 9-inch round cake pans. This prevents the cakes from sticking and allows for easy removal. Use baking spray with flour for extra insurance.
- In a large bowl, sift together flour, sugar, cocoa powder, baking powder, baking soda, and salt. Sifting ensures that there are no lumps and the dry ingredients are evenly distributed.
- Add eggs, milk, oil, and vanilla extract. These wet ingredients should be thoroughly combined.
- Beat on medium speed for 2 minutes. Beating ensures a smooth batter and activates the gluten in the flour, creating a tender crumb.
- Stir in boiling water until smooth. The boiling water will thin the batter slightly and intensify the chocolate flavor. Be careful when adding boiling water to avoid splattering.
- Divide batter evenly between pans. This ensures that the cake layers bake evenly. Use a kitchen scale for precise measuring.
- Bake for 30-35 minutes. Check for doneness by inserting a toothpick into the center of each cake; it should come out clean or with a few moist crumbs attached.
- Cool in pans for 10 minutes, then on a wire rack. Cooling in the pans prevents the cakes from collapsing, and cooling on a wire rack allows air to circulate and prevents them from becoming soggy.
Step 2: Assemble the Cake
- Line pans with plastic wrap, leaving overhang. This will make it easier to remove the ice cream cake layers later. The overhang acts as handles for lifting.
- Place one cake layer in each pan. Ensure the cake layers fit snugly in the lined pans.
- Spread softened strawberry ice cream over each cake layer. The ice cream should be soft enough to spread easily but not completely melted. Aim for a smooth, even layer.
- Cover and freeze until firm, about 4 hours or overnight. This allows the ice cream to re-freeze completely, creating solid layers. Freezing overnight is preferable for best results.
Step 3: Make the Chocolate Ganache
- Heat cream in a saucepan until it begins to simmer. Watch closely to prevent the cream from boiling over.
- Remove from heat, add chocolate chips, let sit for 5 minutes, then stir until smooth. Allowing the chocolate chips to sit in the hot cream helps them melt more evenly.
- Let cool slightly. This will thicken the ganache to a more spreadable consistency.
Step 4: Finish Assembling
- Remove cake layers from the freezer. They should be frozen solid.
- Place one ice cream-topped cake layer on a serving plate. Be careful when transferring the frozen cake layer.
- Pour half the ganache over the cake, spreading evenly. Work quickly before the ganache sets.
- Place the second cake layer on top and pour remaining ganache over it. Align the layers carefully for a neat presentation.
- Garnish with sliced strawberries and chocolate shavings. Arrange the strawberries in an attractive pattern and sprinkle generously with chocolate shavings.
- Freeze for at least 1 hour before serving. This allows the ganache to set and the cake to become firm again.
COOKING Rating: Intermediate
Serving Suggestions: Serve chilled. Cut into slices with a sharp knife. Serve with a scoop of extra strawberry ice cream or a dollop of whipped cream for an extra treat.
Tips:
- Make the cake layers and ganache ahead of time to save time on the day of assembly.
- Use high-quality ingredients for the best flavor.
- Don’t overbake the cake layers.
- Soften the ice cream just enough to spread easily.
- Freeze the cake layers thoroughly before assembling.
- Let the ganache cool slightly before pouring it over the cake.
- Freeze the assembled cake for at least 1 hour before serving.
- Use a hot knife to cut neat slices.
Prep Time: 45 minutes Cook Time: 30-35 minutes Total Time: 5 hours (includes freezing time)
Nutritional Information: (Approximate, per serving) Calories: 600 Protein: 8g Sodium: 300mg
Conclusion
The Chocolate Covered Strawberry Ice Cream Cake is a celebration in every slice. From the moist, cocoa-rich cake layers to the cool, creamy strawberry ice cream and the decadent chocolate ganache, every component works in harmony to create a dessert that’s both satisfying and impressive. The fresh strawberries and chocolate shavings add a touch of elegance, making it perfect for any special occasion.
This recipe is more than just a dessert; it’s an experience. It’s about creating something beautiful and delicious that brings joy to those who share it with you. So, gather your ingredients, follow the steps, and prepare to delight your friends and family with this extraordinary Chocolate Covered Strawberry Ice Cream Cake.
Q&A
Q1: Can I use different flavors of ice cream for this cake?
A: Absolutely! While this recipe calls for strawberry ice cream, you can easily customize it to your preferences. Vanilla, chocolate, or even a swirl of both would work wonderfully. Consider complementing the chocolate cake with flavors like raspberry ripple or mint chocolate chip for a delightful twist. The key is to choose an ice cream that pairs well with chocolate and strawberries.
Q2: Can I make the cake layers ahead of time?
A: Definitely! In fact, making the cake layers ahead of time is a great way to break up the preparation process. You can bake the cake layers a day or two in advance, wrap them tightly in plastic wrap, and store them at room temperature or in the refrigerator. This will save you time on the day you plan to assemble the cake. Just make sure to bring the cake layers to room temperature before assembling the ice cream cake.
Q3: What if I don’t have 9-inch round cake pans? Can I use a different size or shape?
A: While 9-inch round cake pans are recommended for this recipe, you can adapt it to other sizes or shapes. If you use smaller pans, you may need to adjust the baking time accordingly. Keep a close eye on the cakes and check for doneness after about 25 minutes. You can also use a square or rectangular cake pan, but the layers may not be as visually appealing when sliced. Remember to adjust the amount of ice cream accordingly to fit the size of your cake layers.
Q4: Can I use store-bought cake instead of making it from scratch?
A: Yes, you can absolutely use store-bought cake layers if you’re short on time or prefer not to bake from scratch. Choose a good-quality chocolate cake that is moist and flavorful. Slice the cake layers in half horizontally to create the two layers needed for the ice cream cake. Be mindful of the thickness of the layers to ensure a balanced ratio of cake to ice cream.
Q5: How do I prevent the ice cream from melting too quickly while assembling the cake?
A: To minimize melting during assembly, work quickly and efficiently. Have all your ingredients and tools ready before you begin. Soften the ice cream just enough to make it spreadable, but not so much that it becomes liquid. Consider placing the serving plate and the cake layers in the freezer for a few minutes before assembling to keep them cold. If the ice cream starts to melt too much, pop the cake back into the freezer for a short while to firm it up before continuing.