Description of this recipe
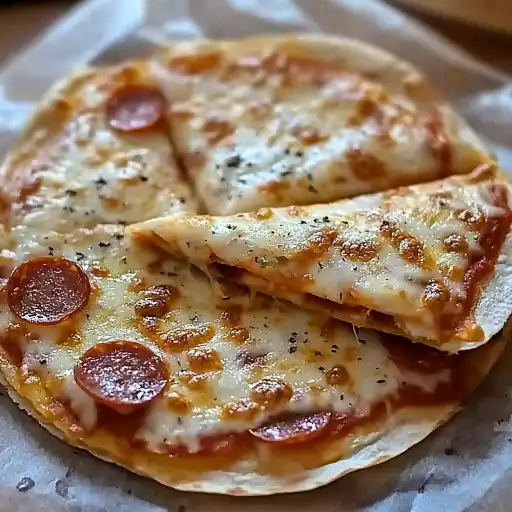
Pepperoni Pizzadillas are a delightful fusion of two popular comfort foods: pizza and quesadillas. This recipe combines the cheesy, savory goodness of a pepperoni pizza with the ease and portability of a quesadilla, making it a perfect quick lunch, snack, or light dinner. Imagine the satisfying crunch of a golden-brown tortilla, giving way to a molten, cheesy center bursting with pepperoni flavor. This is not just a meal; it’s an experience that brings joy to every bite.
Why you will love this recipe
You’ll love this recipe because it’s incredibly versatile, quick, and satisfying. It requires minimal ingredients and effort, making it ideal for busy weeknights or impromptu gatherings. The pizzadilla can be customized with your favorite pizza toppings, ensuring a personalized flavor profile that caters to everyone’s tastes. It’s a guaranteed crowd-pleaser that’s fun to make and even more fun to eat! The combination of familiar flavors in a novel format makes it an instant hit with both kids and adults. Plus, it’s a great way to use up leftover ingredients in your fridge, reducing food waste and creating a tasty meal in the process.
Ingredients:
- 2 flour tortillas (8-inch size)
- ½ cup shredded mozzarella cheese
- 10–12 slices pepperoni
- 2 tablespoons pizza sauce (plus extra for dipping)
- 1 tablespoon butter (or olive oil) for grilling
- 1 tablespoon grated Parmesan cheese (optional)
- ½ teaspoon Italian seasoning (optional)
- Red pepper flakes (optional, for spice)
Optional Add-Ins:
- Sautéed mushrooms
- Sliced black olives
- Fresh basil
- Diced green bell peppers
- Cooked sausage crumbles
Preparation:
Step 1: Prepare Your Ingredients
Begin by gathering all the necessary ingredients. This includes the flour tortillas, mozzarella cheese, pepperoni slices, pizza sauce, butter (or olive oil), and any optional ingredients such as Parmesan cheese, Italian seasoning, red pepper flakes, sautéed mushrooms, sliced black olives, fresh basil, diced green bell peppers, or cooked sausage crumbles. Warming the tortillas slightly in a microwave or on a dry skillet will make them more pliable and easier to fold without tearing. Ensure that all your ingredients are within reach, as this will streamline the assembly process and prevent any unnecessary delays.
Step 2: Assemble the Pizzadilla
Lay one tortilla flat on a clean surface. Spread a thin, even layer of pizza sauce over the entire surface of the tortilla, leaving a small border around the edge to prevent the sauce from oozing out during cooking. Sprinkle half of the shredded mozzarella cheese evenly over the pizza sauce. This layer of cheese will act as a binder for the pepperoni and other toppings, ensuring that everything stays in place. Next, evenly layer the pepperoni slices over the cheese. Arrange them in a way that covers as much of the surface as possible without overlapping too much. If using any optional toppings such as sautéed mushrooms, sliced black olives, diced green bell peppers, or cooked sausage crumbles, sprinkle them over the pepperoni. Finally, top with the remaining mozzarella cheese. This top layer of cheese will melt and create a gooey, satisfying texture. Place the second tortilla on top of the assembled pizzadilla, pressing down gently to secure the filling. This will help the pizzadilla hold its shape during cooking and prevent the ingredients from spilling out.
Step 3: Grill to Perfection
Heat the butter (or olive oil) in a non-stick skillet over medium heat. Ensure that the skillet is evenly heated to prevent hotspots and ensure even cooking. Carefully place the assembled pizzadilla into the skillet. Cook for approximately 2–3 minutes on each side, or until the tortilla is golden brown and crispy, and the cheese is completely melted and gooey. Use a spatula to carefully flip the pizzadilla, ensuring that it doesn’t fall apart. If using Parmesan cheese and Italian seasoning, sprinkle them over the top of the pizzadilla after flipping. The Parmesan cheese will add a salty, nutty flavor, while the Italian seasoning will enhance the overall aroma and taste.
Step 4: Slice and Serve
Once the pizzadilla is cooked to perfection, carefully remove it from the skillet and place it on a cutting board. Let it cool for 1–2 minutes before slicing. This will allow the cheese to set slightly and prevent it from being too runny. Use a pizza cutter or a sharp knife to slice the pizzadilla into wedges. Serve hot with extra pizza sauce for dipping. The extra pizza sauce will provide an additional burst of flavor and moisture, enhancing the overall experience.
COOKING Rating:
- Ease of Preparation: 5/5 (Very Easy)
- Taste: 5/5 (Excellent)
- Versatility: 4/5 (Highly Customizable)
- Kid-Friendly: 5/5 (A Guaranteed Hit)
- Overall: 5/5 (A Must-Try Recipe)
Serving Suggestions:
- Serve hot with extra pizza sauce for dipping.
- Pair with a side salad for a balanced meal.
- Add a sprinkle of red pepper flakes for extra spice.
- Serve with a side of marinara sauce or ranch dressing.
- Cut into smaller pieces for appetizers or snacks.
- Serve alongside a warm bowl of tomato soup for a comforting meal.
- Offer a variety of dipping sauces to cater to different preferences.
Tips:
- Warm the tortillas slightly before assembling to prevent tearing.
- Use a non-stick skillet to prevent the pizzadilla from sticking.
- Press down gently on the pizzadilla while cooking to ensure even melting of the cheese.
- Don’t overcrowd the skillet; cook one pizzadilla at a time for best results.
- Adjust the cooking time based on the thickness of your tortillas and the heat of your skillet.
- Experiment with different types of cheese and toppings to create your own unique pizzadilla variations.
- Use a pizza stone in the oven for an even crispier tortilla.
Prep Time:
- 5 minutes
Cook Time:
- 5 minutes
Total Time:
- 10 minutes
Nutritional Information:
- (Note: Nutritional information is approximate and may vary based on specific ingredients and portion sizes.)
Calories:
- Approximately 350-450 calories per pizzadilla
Protein:
- Approximately 15-20 grams
Sodium:
- Approximately 700-900 milligrams
Conclusion
The Pepperoni Pizzadilla is a simple yet incredibly satisfying recipe that offers a creative twist on two classic favorites. Its versatility, ease of preparation, and delicious flavor make it a perfect choice for a quick lunch, snack, or light dinner. Whether you’re looking for a fun way to use up leftover ingredients or simply craving a comforting and flavorful meal, the Pepperoni Pizzadilla is sure to become a staple in your kitchen. So gather your ingredients, fire up the skillet, and get ready to enjoy a culinary adventure that’s both easy and delicious! This recipe is not just about making a meal; it’s about creating a joyful experience that brings people together and leaves them craving for more.
Questions and Answers:
Q1: Can I use gluten-free tortillas for this recipe?
A: Yes, you can definitely use gluten-free tortillas! This recipe is very adaptable, and using gluten-free tortillas is a great way to make it accessible for those with gluten sensitivities or dietary restrictions. Just be aware that gluten-free tortillas can sometimes be a bit more fragile than regular flour tortillas, so handle them with care when assembling and flipping the pizzadilla. You might also find that they crisp up a bit differently, so keep an eye on the cooking time to ensure they don’t burn.
Q2: What other toppings can I add to my Pepperoni Pizzadilla?
A: The possibilities are endless! Feel free to get creative with your toppings. Some popular options include sautéed mushrooms, sliced black olives, diced green bell peppers, cooked sausage crumbles, fresh basil, spinach, onions, and even pineapple for those who enjoy a sweet and savory combination. Consider what you typically enjoy on your pizza and adapt those flavors to your pizzadilla. Just be mindful not to overload it with too many toppings, as this can make it difficult to cook evenly and can cause the pizzadilla to fall apart.
Q3: Can I make this recipe in the oven instead of on the stovetop?
A: Absolutely! Making it in the oven is a fantastic alternative. Preheat your oven to 375°F (190°C). Assemble the pizzadilla as instructed, then place it on a baking sheet lined with parchment paper. Bake for about 8-10 minutes, or until the tortilla is golden brown and the cheese is melted and bubbly. Using the oven can provide a more even cooking experience and can be especially useful if you’re making multiple pizzadillas at once. For an extra crispy tortilla, you can also use a pizza stone.
Q4: How can I make this recipe spicier?
A: If you like a little heat, there are several ways to add some spice. You can sprinkle red pepper flakes over the cheese before adding the top tortilla, or you can mix a pinch of cayenne pepper into the pizza sauce. Another option is to use a spicy pepperoni or add a drizzle of hot sauce after cooking. For an extra kick, consider adding some sliced jalapeños or a sprinkle of chili powder to the filling. Experiment with different levels of spice to find your perfect balance.
Q5: Can I prepare the pizzadillas ahead of time and cook them later?
A: Yes, you can prepare them in advance, which makes this recipe even more convenient. Assemble the pizzadillas as instructed, then wrap them tightly in plastic wrap or store them in an airtight container in the refrigerator. When you’re ready to cook them, simply heat them in a skillet as directed. Keep in mind that the tortillas might absorb some moisture from the sauce and cheese while refrigerated, so they might take a bit longer to cook. Be sure to adjust the cooking time accordingly to ensure they are heated through and the tortillas are crispy.