Description of this recipe
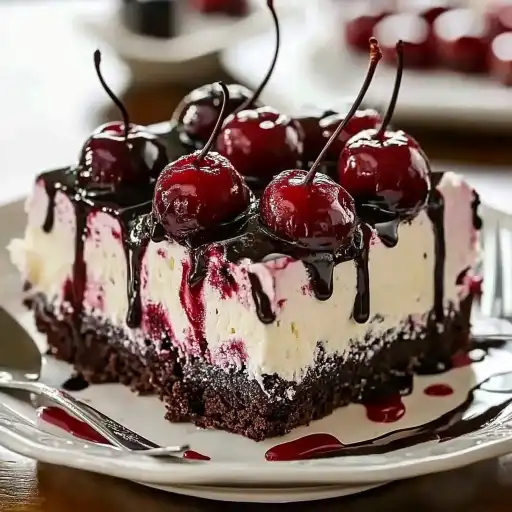
Indulge in the ultimate dessert experience with our Cherry Chocolate Ice Cream Cake. This delightful treat combines the rich flavors of cherry ice cream, fresh cherries, and decadent chocolate, all nestled in a crisp graham cracker crust. Perfect for any occasion, this ice cream cake is sure to impress your family and friends.
Why you will love this recipe
You’ll adore this Cherry Chocolate Ice Cream Cake for its harmonious blend of textures and tastes. The creamy ice cream, juicy cherries, and crunchy chocolate chips create a symphony of flavors that dance on your palate. Plus, it’s incredibly easy to make, requiring minimal baking and preparation time. This dessert is a guaranteed crowd-pleaser, offering a refreshing and satisfying treat that’s perfect for hot summer days or festive celebrations. The combination of sweet, tangy, and chocolatey notes makes it an irresistible indulgence that everyone will rave about.
Ingredients:
- 1 1/2 cups graham cracker crumbs
- 1/3 cup sugar
- 6 tbsp unsalted butter, melted
- 1 pint cherry ice cream, softened
- 1 cup fresh cherries, pitted and halved
- 1/2 cup mini chocolate chips
- 1/2 cup whipped cream
- 1/4 cup chocolate sauce
Preparation:
Step 1: Prepare the Graham Cracker Crust: Begin by preheating your oven to 350°F (175°C). In a medium-sized bowl, combine the graham cracker crumbs, sugar, and melted butter. Mix these ingredients thoroughly until they are well combined and the mixture resembles wet sand. This ensures that the crust will hold together properly.
Step 2: Press the Crust into the Pan: Take a 9-inch pie pan and evenly press the graham cracker mixture into the bottom and up the sides of the pan. Use the back of a spoon or your fingers to create a uniform layer. Make sure the crust is compact to prevent it from crumbling apart after baking.
Step 3: Bake the Crust: Place the pie pan in the preheated oven and bake for 8-10 minutes. The crust should be lightly golden brown around the edges. This baking process helps to solidify the crust, giving it a nice, crispy texture that complements the creamy filling. Once baked, remove the pan from the oven and allow the crust to cool completely on a wire rack.
Step 4: Prepare the Ice Cream Filling: In a large bowl, gently soften the cherry ice cream. Be careful not to melt it completely; you want it to be soft enough to mix but still retain its shape. Once the ice cream is softened, fold in the fresh cherries and mini chocolate chips. Distribute these ingredients evenly throughout the ice cream to ensure every bite is packed with flavor.
Step 5: Assemble the Cake: Pour the cherry ice cream mixture into the cooled graham cracker crust, spreading it evenly to fill the pan. Gently smooth the top with a spatula or spoon to create an even surface. This ensures a neat and appealing presentation.
Step 6: Freeze the Cake: Cover the pie pan with plastic wrap or aluminum foil to prevent freezer burn. Place the cake in the freezer for at least 4 hours, or preferably overnight. This allows the ice cream to firm up completely, resulting in a solid and sliceable cake.
Step 7: Garnish and Serve: Just before serving, remove the ice cream cake from the freezer. Top it with luscious whipped cream, spreading it evenly over the surface. Garnish with additional fresh cherries and mini chocolate chips for an extra touch of elegance. Drizzle with chocolate sauce for a final flourish of flavor.
COOKING Rating:
Easy
Serving Suggestions:
This Cherry Chocolate Ice Cream Cake is perfect for serving at birthday parties, summer barbecues, or as a special treat after dinner. Serve it chilled, and pair it with a scoop of extra cherry ice cream or a side of fresh fruit for a more elaborate presentation. It also goes well with a cup of hot coffee or a sweet dessert wine.
Tips:
- To prevent the graham cracker crust from becoming soggy, brush it with a thin layer of melted chocolate after baking and before adding the ice cream filling.
- If you don’t have fresh cherries, you can use frozen cherries (thawed and drained) or maraschino cherries (halved).
- For a richer chocolate flavor, use dark chocolate chips instead of mini chocolate chips.
- To easily slice the ice cream cake, dip a long, sharp knife in hot water and wipe it dry before each slice.
- Store any leftover cake in the freezer, wrapped tightly in plastic wrap or aluminum foil, for up to one week.
Prep Time: 20 minutes
Cook Time: 8-10 minutes
Total Time: 4 hours 30 minutes (including freezing time)
Nutritional Information: (per serving, approximate) Calories: 450 Protein: 5g Sodium: 200mg
Conclusion
The Cherry Chocolate Ice Cream Cake is a delightful dessert that combines the best of both worlds: creamy ice cream and crunchy crust, sweet cherries and rich chocolate. It’s simple to make, incredibly delicious, and perfect for any occasion. Whether you’re celebrating a special event or simply craving a sweet treat, this ice cream cake is sure to satisfy your cravings and leave you wanting more. So gather your ingredients, follow our easy steps, and prepare to indulge in a slice of heaven! Enjoy the delightful combination of flavors and textures, and share the joy with your loved ones.
5 Questions and Answers About This Recipe
- Can I use a different type of ice cream? Absolutely! While this recipe calls for cherry ice cream, you can easily substitute it with your favorite flavor. Vanilla, chocolate, or even strawberry ice cream would work wonderfully. Just make sure the ice cream is softened before mixing it with the cherries and chocolate chips.
- What if I don’t have graham crackers? If you don’t have graham crackers on hand, you can use other types of cookies or crackers to make the crust. Vanilla wafers, chocolate cookies, or even digestive biscuits can be used as a substitute. Simply crush them into crumbs and follow the same steps for making the crust.
- Can I make this cake ahead of time? Yes, you can definitely make this cake ahead of time. In fact, it’s recommended to freeze the cake for at least 4 hours to allow the ice cream to firm up completely. You can even make it a day or two in advance and store it in the freezer until you’re ready to serve it. Just make sure to wrap it tightly to prevent freezer burn.
- How do I prevent the crust from getting soggy? To prevent the crust from getting soggy, you can brush it with a thin layer of melted chocolate after baking and before adding the ice cream filling. The chocolate acts as a barrier, preventing the moisture from the ice cream from seeping into the crust. Additionally, make sure to cool the crust completely before adding the filling.
- What other toppings can I use? The possibilities are endless when it comes to toppings! In addition to whipped cream, fresh cherries, and chocolate sauce, you can use chopped nuts, sprinkles, caramel sauce, or even a dusting of cocoa powder. Get creative and customize the toppings to suit your taste preferences.