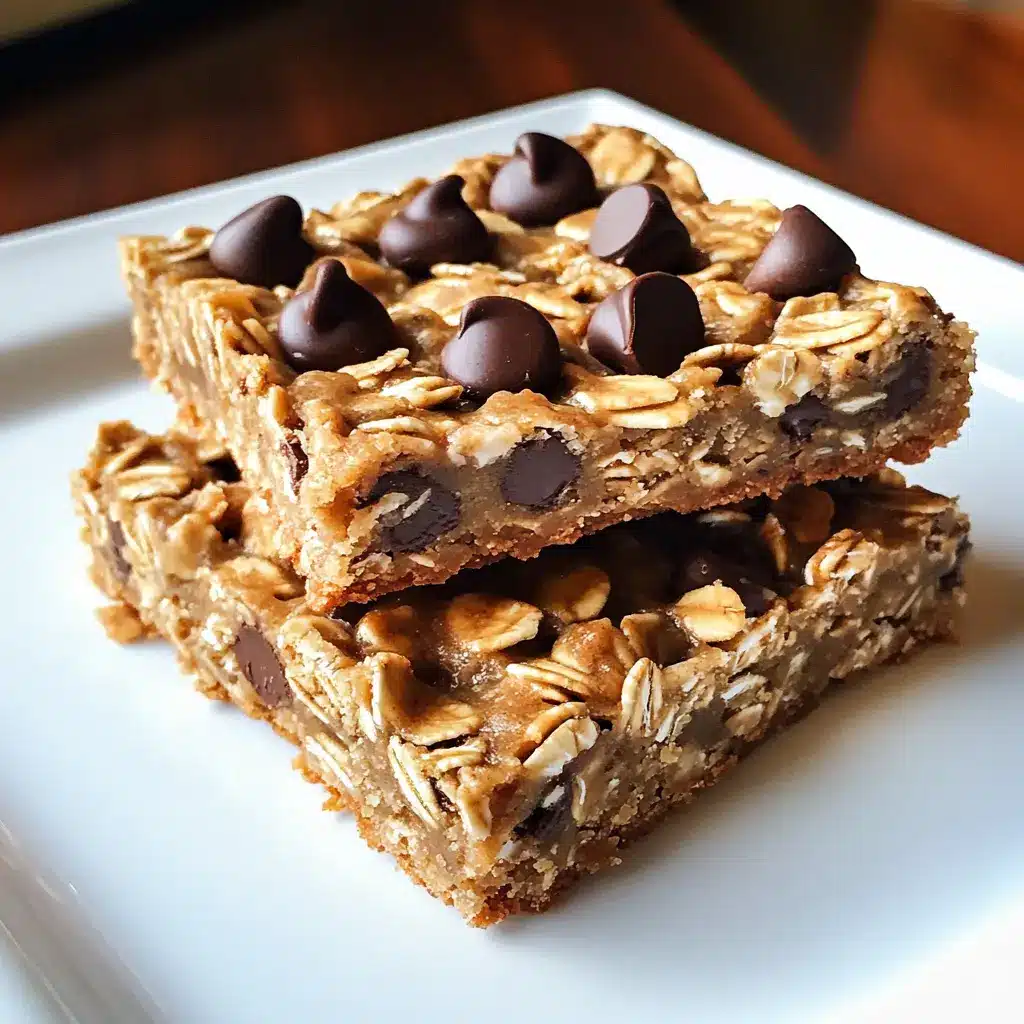
Description: These Chocolate Chip Peanut Butter Granola Cookie Bars are the perfect no-fuss treat for any occasion. They combine the wholesome goodness of oats, peanut butter, and granola with the irresistible sweetness of chocolate chips, all baked into a convenient and delicious bar. These bars strike a perfect balance between a healthy snack and a satisfying dessert, making them ideal for breakfast, a midday pick-me-up, or an after-dinner indulgence. They’re also incredibly easy to make, requiring minimal ingredients and simple steps.
Why You Will Love This Recipe:
- Easy and Quick: This recipe is perfect for busy individuals who crave a homemade treat without spending hours in the kitchen. The entire process, from prep to baking, takes less than 30 minutes.
- Healthy and Wholesome: Packed with whole grains from the rolled oats and granola, protein from the peanut butter, and natural sweetness from honey or maple syrup, these bars are a healthier alternative to store-bought cookies.
- Customizable: You can easily adapt this recipe to suit your preferences. Add different types of nuts, seeds, dried fruit, or even swap out the chocolate chips for white chocolate or butterscotch chips.
- Perfect for On-the-Go: These bars are incredibly portable, making them a great option for school lunches, road trips, hiking, or any time you need a quick and convenient snack.
- Delicious and Satisfying: The combination of peanut butter, chocolate chips, and granola creates a symphony of flavors and textures that will leave you wanting more. The chewy texture and rich taste make these bars a crowd-pleaser.
Introduction
In the realm of quick and satisfying treats, these Chocolate Chip Peanut Butter Granola Cookie Bars stand out as a champion of simplicity and flavor. Forget complicated recipes and lengthy baking sessions. This recipe offers a delightful shortcut to homemade goodness, combining pantry staples into a symphony of chewy, chocolatey, and peanut buttery perfection.
Imagine the satisfying crunch of granola mingling with the wholesome goodness of rolled oats, all held together by the creamy embrace of peanut butter and a touch of natural sweetness. Then, add the irresistible allure of chocolate chips, melting into every bite and creating pockets of pure joy. These bars are more than just a snack; they’re a testament to the idea that deliciousness doesn’t have to be difficult.
Whether you’re a seasoned baker looking for a quick and easy treat or a novice in the kitchen eager to create something impressive, this recipe is for you. It’s perfect for busy mornings, after-school snacks, or anytime you crave a comforting and wholesome indulgence. So, gather your ingredients, preheat your oven, and prepare to be amazed by the simplicity and deliciousness of these Chocolate Chip Peanut Butter Granola Cookie Bars.
Ingredients:
- 1 ½ cups Rolled Oats: Provides a hearty and chewy texture, adding wholesome fiber and substance to the bars. Opt for old-fashioned rolled oats for the best texture.
- ½ cup Peanut Butter (Unsweetened): Acts as a binder, adds a rich, nutty flavor, and contributes a healthy dose of protein and healthy fats. Ensure it’s unsweetened to control the overall sweetness. Creamy peanut butter works best.
- ¼ cup Honey or Maple Syrup: Serves as a natural sweetener and adds moisture, contributing to the bars’ chewy texture. Honey provides a slightly floral flavor, while maple syrup offers a richer, caramel-like note. Choose your preference based on your taste.
- ½ teaspoon Vanilla Extract: Enhances the overall flavor profile, adding a touch of warmth and complexity. Use pure vanilla extract for the best results.
- ½ teaspoon Cinnamon: Adds a warm, spicy note that complements the peanut butter and chocolate, creating a comforting and aromatic experience.
- ½ teaspoon Baking Soda: Helps the bars to rise slightly and creates a lighter, chewier texture.
- ¼ teaspoon Salt: Balances the sweetness and enhances the other flavors, preventing the bars from tasting bland.
- ½ cup Granola: Adds a satisfying crunch and a variety of textures, contributing to the bars’ overall appeal. Choose your favorite granola variety; fruit and nut granolas work particularly well.
- ½ cup Chocolate Chips: Provides the classic chocolatey sweetness that makes these bars irresistible. Semi-sweet or dark chocolate chips are recommended to balance the sweetness, but milk chocolate chips can be used for a sweeter treat.
Preparation:
Step 1: Preheat and Prepare: Preheat your oven to 350°F (175°C). This ensures even baking and prevents the bars from becoming too hard or dry. Line an 8×8-inch baking dish with parchment paper, leaving an overhang on the sides. This makes it easy to lift the baked bars out of the pan and slice them neatly. Press the parchment paper into the corners of the pan for a snug fit.
Step 2: Combine Dry Ingredients: In a large mixing bowl, combine the rolled oats, cinnamon, baking soda, salt, and granola. Use a whisk or fork to stir the ingredients together until they are evenly distributed. This ensures that each ingredient is incorporated into the bars, providing a consistent flavor and texture. This even distribution is crucial for the baking soda to react properly and for the spices to flavor the whole mixture.
Step 3: Combine Wet Ingredients: In a separate bowl, mix together the peanut butter, honey or maple syrup, and vanilla extract until smooth. Use a fork or whisk to combine the ingredients thoroughly. The peanut butter should be soft and pliable, not hard or chunky. If the peanut butter is too thick, you can microwave it for a few seconds to soften it. Ensure the honey or maple syrup is well combined with the peanut butter and vanilla extract, creating a smooth and homogenous mixture.
Step 4: Combine Wet and Dry: Pour the wet mixture into the dry ingredients and stir to combine. Use a sturdy spoon or spatula to mix the ingredients together until they are evenly coated. Be careful not to overmix, as this can result in tough bars. The mixture should be slightly sticky and hold its shape when pressed together. Ensure no dry pockets of ingredients remain and that the wet ingredients are evenly distributed throughout.
Step 5: Fold in Chocolate Chips: Gently fold in the chocolate chips until they are evenly distributed throughout the mixture. Be careful not to overmix, as this can cause the chocolate chips to melt. Spread the chocolate chips around so that every bite has a wonderful burst of melted goodness.
Step 6: Press into Pan: Press the mixture evenly into the prepared baking dish with a spatula or your hands. Ensure that the mixture is spread evenly across the bottom of the pan, creating a uniform thickness. Use the back of a spoon or a piece of parchment paper to smooth the surface of the bars. Press firmly to compact the mixture, which will help the bars hold their shape during baking.
Step 7: Bake: Bake for 15–18 minutes, or until the edges are golden brown and the center is set. The baking time may vary depending on your oven, so keep a close eye on the bars. The bars are done when they are firm to the touch and a toothpick inserted into the center comes out clean. Avoid overbaking, as this can result in dry and crumbly bars.
Step 8: Cool and Slice: Allow the bars to cool completely in the baking dish before slicing them into squares. This allows the bars to set properly and prevents them from crumbling when sliced. Cooling completely also allows the flavors to meld together, enhancing the overall taste. Use the parchment paper overhang to lift the bars out of the pan and place them on a cutting board. Cut the bars into desired shapes and sizes using a sharp knife.
COOKING Rating:
- Ease of Preparation: 5/5 (Extremely Easy)
- Ingredient Accessibility: 5/5 (Common Pantry Staples)
- Time Required: 4/5 (Quick and Efficient)
- Taste: 5/5 (Delicious and Satisfying)
- Overall: 5/5 (Highly Recommended)
Serving Suggestions:
- Breakfast: Enjoy a bar with a glass of milk or yogurt for a quick and nutritious breakfast.
- Snack: Pack a bar for a mid-morning or afternoon snack to satisfy your cravings and boost your energy.
- Dessert: Serve a bar with a scoop of ice cream or a dollop of whipped cream for a simple yet satisfying dessert.
- Party Treat: Cut the bars into smaller squares and serve them at parties or gatherings.
- Gift: Wrap individual bars in cellophane bags and tie with a ribbon for a thoughtful and homemade gift.
Tips:
- Adjust Sweetness: If you prefer a sweeter bar, increase the amount of honey or maple syrup. If you prefer a less sweet bar, reduce the amount of sweetener or use unsweetened applesauce instead.
- Add Ins: Feel free to add other ingredients to customize the bars to your liking. Nuts, seeds, dried fruit, or coconut flakes are all great additions.
- Storage: Store the bars in an airtight container at room temperature for up to 5 days or in the refrigerator for up to 2 weeks.
- Freezing: These bars can also be frozen for up to 2 months. Wrap them individually in plastic wrap and store them in a freezer-safe container.
- Peanut Butter Substitute: If you have peanut allergies, use other nut butter such as almond or cashew. You can also use sunflower seed butter.
Prep Time:
- 10 minutes
Cook Time:
- 15-18 minutes
Total Time:
- 25-28 minutes
Nutritional Information (per bar, approximate):
- Calories: 250-300
- Protein: 8-10g
- Sodium: 100-150mg
Conclusion
These Chocolate Chip Peanut Butter Granola Cookie Bars are a testament to the fact that delicious treats don’t have to be complicated. With just a handful of pantry staples and a few simple steps, you can create a batch of chewy, chocolatey, and utterly irresistible bars that are perfect for any occasion. Whether you’re looking for a quick and healthy breakfast, a satisfying snack, or a simple dessert, these bars are sure to hit the spot. So, go ahead and try this recipe today and discover your new favorite way to enjoy the classic combination of peanut butter and chocolate!
Questions and Answers About This Recipe
Q1: Can I substitute the peanut butter with almond butter or another nut butter?
A: Absolutely! Almond butter, cashew butter, or even sunflower seed butter can be used as a direct substitute for peanut butter in this recipe. The flavor will be slightly different depending on the nut butter you choose, but the texture and consistency will remain the same. Just make sure to use a smooth, unsweetened nut butter for the best results. Using alternative nut butters will still give you a boost of protein and healthy fats while catering to any peanut allergies or preferences.
Q2: How can I make these bars vegan?
A: Making these bars vegan is surprisingly easy! The key is to substitute the honey with another liquid sweetener like maple syrup, agave nectar, or even brown rice syrup. Ensure that your chocolate chips are also vegan (many dark chocolate chips are naturally vegan, but always check the label). With these simple substitutions, you can enjoy a delicious and wholesome vegan treat that everyone will love.
Q3: What if I don’t have an 8×8 inch baking dish? Can I use a different size?
A: While an 8×8 inch baking dish is ideal for achieving the perfect thickness for these bars, you can certainly use a different size. If you use a larger baking dish, the bars will be thinner and may bake slightly faster, so keep a close eye on them. If you use a smaller baking dish, the bars will be thicker and may require a longer baking time. Adjust the baking time accordingly to ensure the bars are fully cooked but not overbaked. A 9×13 inch pan is possible; the bars will just be thin.
Q4: My granola is very chunky. Will that affect the bars?
A: While chunky granola will still work in this recipe, it can affect the overall texture of the bars. The bars might be a little more crumbly and less uniform. If you prefer a smoother texture, you can pulse the granola in a food processor for a few seconds to break it down into smaller pieces before adding it to the mixture. This will help the granola distribute more evenly throughout the bars and create a more cohesive texture.
Q5: Can I add dried fruit to these bars? If so, what kind would you recommend?
A: Absolutely! Dried fruit is a fantastic addition to these bars, adding a chewy texture and a burst of flavor. Some excellent choices include dried cranberries, raisins, chopped apricots, or even chopped dates. Add about 1/4 to 1/2 cup of dried fruit along with the chocolate chips. For best results, chop the dried fruit into smaller pieces before adding it to the mixture. This ensures that the fruit is evenly distributed and doesn’t create large clumps in the bars.