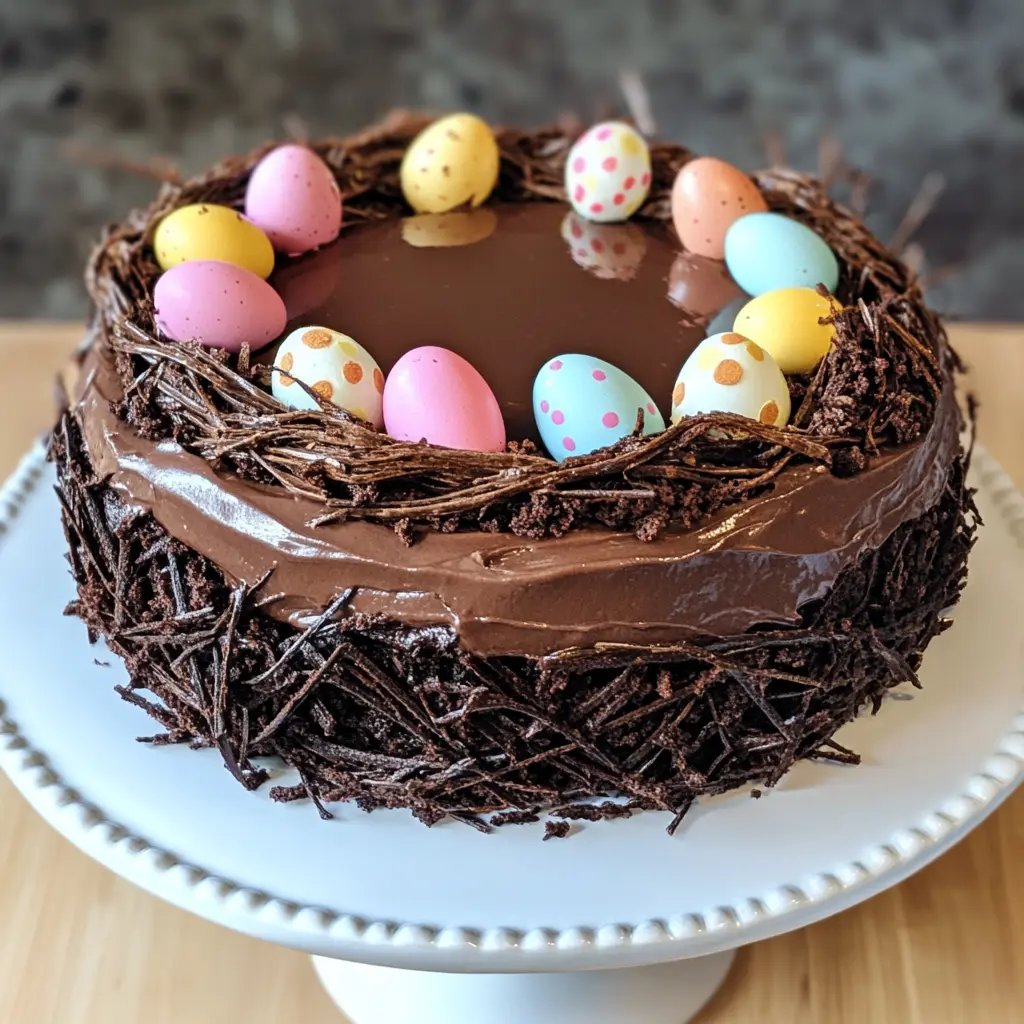
Description of this recipe: This show-stopping Chocolate Easter Egg Nest Cake is a decadent chocolate lover’s dream! It combines a rich, moist chocolate cake with a silky-smooth chocolate ganache and a whimsical chocolate nest filled with colorful Easter eggs. Perfect for a festive Easter celebration, this cake is guaranteed to impress your family and friends.
Why you will love this recipe:
- Impressive Presentation: The chocolate nest adorned with Easter eggs creates a stunning visual centerpiece for your Easter table.
- Deep Chocolate Flavor: The combination of cocoa powder in the cake and dark chocolate in the ganache and nest provides an intense, satisfying chocolate experience.
- Moist and Tender Cake: The buttermilk and hot water in the cake batter result in an incredibly moist and tender crumb.
- Relatively Easy to Make: Despite its elaborate appearance, this cake is surprisingly simple to put together.
- Customizable: You can easily adapt the recipe to your preferences by using different types of chocolate, adding extracts, or decorating the cake with other Easter-themed candies.
Introduction
Easter is a time for family, friends, and delicious food. And what better way to celebrate than with a beautiful and decadent cake? This Chocolate Easter Egg Nest Cake is the perfect dessert to share with loved ones. It combines the rich, comforting flavors of chocolate with the festive touch of Easter decorations. Imagine the delight on everyone’s faces when you present this stunning cake – it’s sure to be a memorable moment!
This recipe breaks down the process into manageable steps, ensuring that even beginner bakers can achieve success. From baking the perfect chocolate cake to creating the intricate chocolate nest, each step is clearly explained with helpful tips and suggestions. Get ready to unleash your inner chocolatier and create a cake that’s as delicious as it is beautiful.
Ingredients:
FOR THE CHOCOLATE CAKE
- 1 ¾ cups (220g) all-purpose flour
- ¾ cup (75g) unsweetened cocoa powder
- 2 cups (400g) granulated sugar
- 2 teaspoons baking powder
- 1 teaspoon baking soda
- ½ teaspoon salt
- 1 cup (240ml) buttermilk
- ½ cup (120ml) vegetable oil
- 2 large eggs
- 2 teaspoons vanilla extract
- 1 cup (240ml) hot water or coffee
FOR THE CHOCOLATE GANACHE
- 1 cup (240ml) heavy cream
- 8 oz (225g) dark chocolate, chopped
- 1 tablespoon unsalted butter
FOR THE CHOCOLATE NEST
- 6 oz (170g) dark chocolate, melted
- Parchment paper
- Mini chocolate eggs or candy-coated Easter eggs
Preparation:
Step 1: Preheat and Prepare the Pan: Begin by preheating your oven to 350°F (175°C). Grease a 9-inch round cake pan thoroughly with butter or cooking spray. Cut a circle of parchment paper to fit the bottom of the pan and place it inside. This will ensure that your cake releases easily after baking. The combination of greasing and parchment paper is a reliable method for preventing sticking.
Step 2: Combine Dry Ingredients: In a large mixing bowl, whisk together the dry ingredients: all-purpose flour, unsweetened cocoa powder, granulated sugar, baking powder, baking soda, and salt. Whisking is important to ensure that these ingredients are evenly distributed, which will contribute to a uniform texture in your final cake. Pay special attention to breaking up any clumps of cocoa powder to prevent pockets of bitter taste.
Step 3: Add Wet Ingredients (Except Hot Water/Coffee): Add the buttermilk, vegetable oil, eggs, and vanilla extract to the dry ingredients. Using an electric mixer (or a sturdy whisk and some elbow grease), mix until all ingredients are just combined. Be careful not to overmix at this stage, as overmixing can lead to a tough cake. The batter will likely appear slightly lumpy at this point – that’s perfectly normal.
Step 4: Incorporate Hot Water/Coffee: Slowly and carefully stir in the hot water or coffee until fully incorporated. The batter will become quite thin and liquidy – don’t be alarmed, this is what creates the cake’s moist texture! The hot water or coffee helps to bloom the cocoa powder, intensifying its flavor and deepening the color of the cake. Using coffee will also add a subtle mocha note to the final product.
Step 5: Bake the Cake: Pour the batter into the prepared cake pan, spreading it evenly. Bake for 30-35 minutes, or until a toothpick inserted in the center of the cake comes out clean. The baking time may vary slightly depending on your oven, so start checking for doneness around the 30-minute mark. If the top of the cake begins to brown too quickly, you can loosely tent it with foil.
Step 6: Cool the Cake: Let the cake cool in the pan for 10 minutes before inverting it onto a wire rack to cool completely. Cooling the cake slightly in the pan allows it to firm up enough to prevent it from breaking when you invert it. Ensure the cake is completely cool before frosting to prevent the ganache from melting.
Step 7: Make the Ganache: Heat the heavy cream in a saucepan over medium heat until it just begins to simmer. Be careful not to let it boil, as boiling can cause the cream to scorch. Remove the saucepan from the heat and pour the hot cream over the chopped dark chocolate in a heatproof bowl.
Step 8: Melt the Chocolate: Let the cream and chocolate sit undisturbed for 2-3 minutes. This allows the heat from the cream to begin melting the chocolate. After 2-3 minutes, gently stir the mixture until the chocolate is completely melted and the ganache is smooth and glossy.
Step 9: Add Butter: Add the unsalted butter to the ganache and stir until it is fully incorporated. The butter adds richness and shine to the ganache. Let the ganache cool slightly at room temperature until it thickens to a pourable consistency. This typically takes about 15-20 minutes.
Step 10: Create the Chocolate Nest: Melt the dark chocolate for the nest in a microwave-safe bowl using 30-second intervals, stirring between each interval, until smooth. This prevents the chocolate from burning. You can also melt the chocolate over a double boiler.
Step 11: Pipe the Nest: Transfer the melted chocolate to a piping bag fitted with a small round tip, or a ziplock bag with a small corner snipped off. On a sheet of parchment paper, pipe the chocolate in crisscrossing strands to form a circular nest shape. Get creative with the design! You can make the nest as intricate or as simple as you like.
Step 12: Chill the Nest: Place the tray with the chocolate nest in the refrigerator for 15-20 minutes, or until the chocolate is firm. This will make it easier to handle and transfer the nest to the cake.
Step 13: Assemble the Cake: Place the cooled cake on a serving platter. Pour the slightly cooled chocolate ganache over the cake, allowing it to drip down the sides.
Step 14: Add the Nest and Eggs: Carefully peel the chocolate nest from the parchment paper and place it on top of the cake. Fill the nest with mini chocolate eggs or candy-coated Easter eggs.
Step 15: Serve and Enjoy: Your Chocolate Easter Egg Nest Cake is now ready to be served! Slice and enjoy with family and friends.
COOKING Rating:
Medium
Serving Suggestions:
- Serve chilled or at room temperature.
- Pair with a scoop of vanilla ice cream or a dollop of whipped cream.
- Offer alongside a glass of cold milk or a cup of hot coffee.
- Garnish with fresh berries for an extra touch of freshness.
Tips:
- For a richer chocolate flavor, use high-quality dark chocolate with a cocoa content of 70% or higher.
- If you don’t have buttermilk, you can make a substitute by adding 1 tablespoon of white vinegar or lemon juice to 1 cup of regular milk and letting it sit for 5 minutes.
- To prevent the chocolate nest from melting, store the cake in a cool place or in the refrigerator.
- You can prepare the cake and ganache a day ahead of time and assemble the cake on the day of serving.
- Get creative with the decorations! Use different colors and types of Easter eggs, or add other candies like jelly beans or marshmallows.
Prep Time:
30 minutes
Cook Time:
30-35 minutes
Total Time:
Approximately 2 hours (including cooling and chilling time)
Nutritional Information:
(Note: Nutritional information is approximate and will vary based on specific ingredients used.)
Calories: Approximately 550 per serving Protein: Approximately 7g per serving Sodium: Approximately 250mg per serving
Conclusion
This Chocolate Easter Egg Nest Cake is more than just a dessert; it’s a celebration of spring, a symbol of togetherness, and a testament to the joy of baking. With its rich chocolate flavors, moist texture, and stunning presentation, this cake is sure to become a family favorite for years to come. So gather your ingredients, roll up your sleeves, and get ready to create a masterpiece that will delight both your taste buds and your eyes. Happy baking, and Happy Easter!
Questions and Answers:
Q1: Can I use a different type of chocolate for the ganache and nest?
A: Absolutely! While this recipe calls for dark chocolate, you can easily substitute milk chocolate, semi-sweet chocolate, or even white chocolate depending on your preference. Keep in mind that the sweetness level will vary depending on the type of chocolate you use, so you may want to adjust the amount of sugar in the cake batter accordingly. For a richer flavor, consider using a combination of different types of chocolate.
Q2: I don’t have buttermilk. Can I use a substitute?
A: Yes, you can easily make a buttermilk substitute! Simply add 1 tablespoon of white vinegar or lemon juice to 1 cup of regular milk. Stir and let it sit for 5 minutes. The acid in the vinegar or lemon juice will curdle the milk slightly, creating a similar consistency and tanginess to buttermilk. This substitute works very well in most baking recipes.
Q3: How do I prevent the chocolate nest from melting?
A: The key to preventing the chocolate nest from melting is to ensure that it is thoroughly chilled before assembling the cake. Keep the cake stored in a cool place, or even in the refrigerator, until you’re ready to serve it. Avoid placing the cake in direct sunlight or near a heat source. You can also temper the chocolate before making the nest, which will make it more stable at room temperature. Tempering involves heating and cooling the chocolate to specific temperatures to align the cocoa butter crystals.
Q4: Can I make the cake ahead of time?
A: Yes, you can definitely make the cake ahead of time! In fact, this is a great way to break up the preparation process. You can bake the cake layers and prepare the ganache a day or two in advance. Wrap the cake layers tightly in plastic wrap and store them at room temperature. Store the ganache in an airtight container in the refrigerator. When you’re ready to assemble the cake, let the ganache come to room temperature and whip it slightly to restore its smooth consistency.
Q5: What can I use instead of Easter eggs to decorate the nest?
A: Feel free to get creative with your decorations! If you don’t have Easter eggs on hand, you can use other types of candies, such as jelly beans, chocolate candies, mini marshmallows, or even fresh berries. You can also add edible glitter or sprinkles for an extra touch of sparkle. For a more natural look, consider using edible flowers or small chocolate shavings. Let your imagination run wild and create a nest that reflects your personal style!