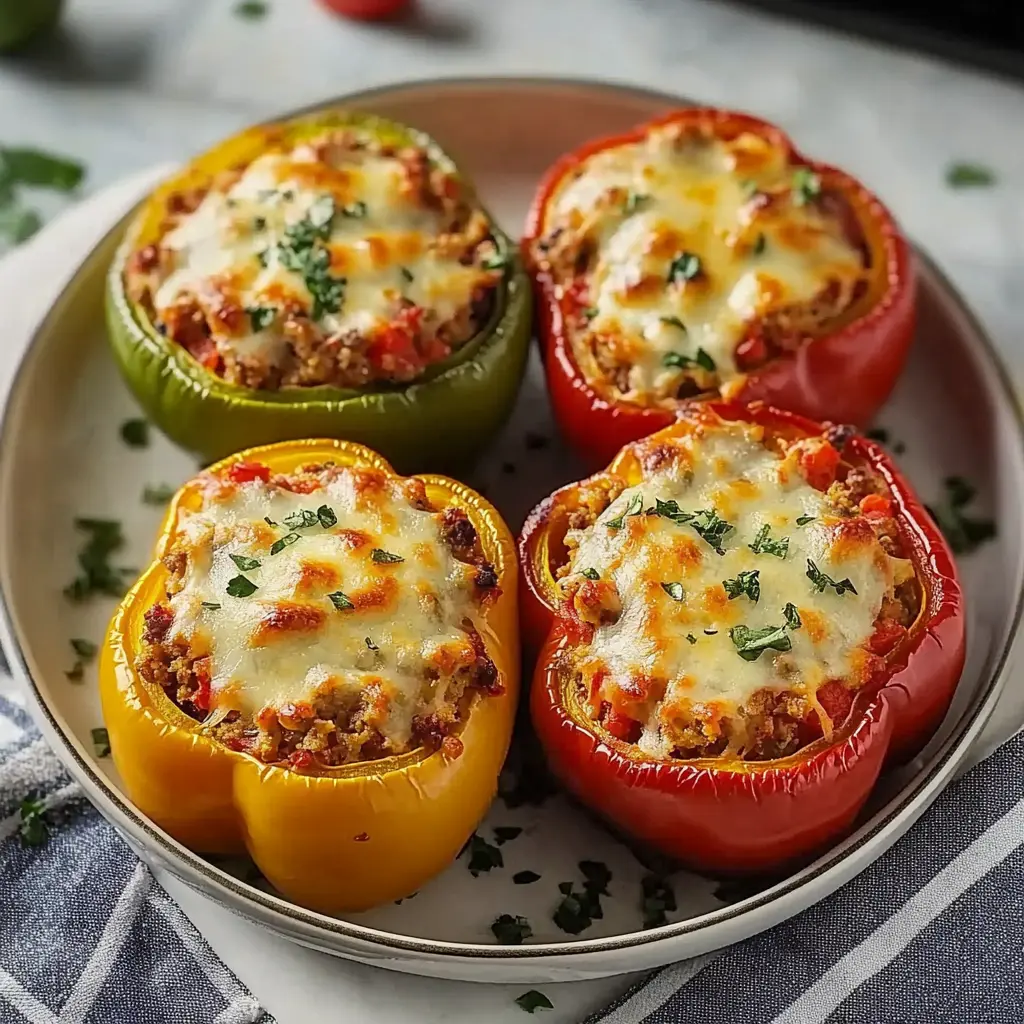
Description of this recipe:
This recipe delivers classic comfort food with a nutritious twist. Tender bell peppers are filled with a savory mixture of seasoned ground beef, fragrant aromatics, fluffy rice, and juicy tomatoes, all topped with a generous layer of melted cheese. It’s a complete meal in a single, vibrant package, perfect for a weeknight dinner or a potluck gathering.
Why you will love this recipe:
This Classic Stuffed Bell Peppers recipe is a winner on so many levels. It’s incredibly satisfying and flavorful, offering a delightful combination of textures and tastes. It’s also surprisingly easy to make, requiring minimal effort and readily available ingredients. Beyond the deliciousness, it’s a customizable and healthy option. You can easily adapt the filling to suit your preferences and dietary needs, adding different vegetables, using alternative proteins, or swapping the cheese for a dairy-free option. Plus, it’s a fantastic way to sneak in extra veggies for picky eaters. But perhaps the best reason to love this recipe is its ability to evoke feelings of warmth and nostalgia. It’s a dish that’s often associated with home-cooked meals and cherished family traditions, making it a comforting and familiar choice.
Introduction:
Stuffed bell peppers are a timeless classic, a culinary staple enjoyed in countless homes across generations. Their vibrant colors, inviting aroma, and satisfying flavors make them a perennial favorite. This recipe offers a simple yet incredibly delicious approach to making stuffed bell peppers, perfect for both novice cooks and seasoned chefs. We’ll guide you through each step, from preparing the peppers to creating the flavorful filling, ensuring a successful and mouthwatering result every time. The beauty of this dish lies in its versatility – you can easily adapt the filling to your liking, incorporating your favorite vegetables, spices, and proteins. Whether you’re looking for a quick weeknight meal or a crowd-pleasing dish for a special occasion, these Classic Stuffed Bell Peppers are sure to impress.
Ingredients:
- 6 bell peppers (any color): Choose firm, evenly shaped peppers for the best results. A mix of colors adds visual appeal.
- 1 tablespoon olive oil: Provides a healthy fat for sautéing and adds richness to the filling.
- 1 pound ground beef: Lean ground beef works well, but you can also use ground turkey, chicken, or a plant-based alternative.
- 1 small onion, diced: Adds sweetness and depth of flavor to the filling.
- 2 cloves garlic, minced: Infuses the filling with a pungent and aromatic flavor. Freshly minced garlic is always preferred.
- 1 cup cooked rice: Long-grain or medium-grain rice is ideal. You can use leftover rice or cook a fresh batch.
- 1 (14.5 oz) can diced tomatoes, drained: Adds moisture and acidity to the filling. Draining the tomatoes prevents the filling from becoming too watery.
- 1 teaspoon Italian seasoning: A blend of herbs that provides a classic Italian flavor profile.
- Salt and pepper to taste: Essential seasonings to enhance the flavors of the ingredients.
- 1 cup shredded cheese (cheddar, mozzarella, or a blend): Adds a creamy and cheesy topping. Choose your favorite cheese or create a blend for a more complex flavor.
- Fresh parsley, chopped (for garnish): Adds a pop of freshness and visual appeal.
Preparation:
Step 1: Preheat your oven to 375°F (190°C). This ensures that the peppers cook evenly and the cheese melts beautifully. Lightly grease a baking dish to prevent the peppers from sticking. A 9×13 inch baking dish is usually sufficient. This will allow the peppers to be snugly within the pan.
Step 2: Prepare the bell peppers. Cut the tops off each pepper, creating a “lid.” Remove the seeds and membranes from inside the peppers, ensuring a clean cavity for the filling. Be meticulous in removing all the seeds, as they can be bitter. If necessary, trim the bottoms of the peppers slightly so they stand upright in the baking dish. This will prevent the filling from spilling out during baking.
Step 3: Cook the ground beef. Heat olive oil in a large skillet over medium heat. Add the ground beef and cook, breaking it up with a spoon, until it is browned and cooked through. Use a spatula to crumble the ground beef into small pieces. Drain off any excess fat. This step is important to prevent the stuffed peppers from becoming greasy. Nobody likes a greasy pepper!
Step 4: Sauté the aromatics. Add the diced onion and minced garlic to the skillet with the cooked ground beef. Cook until the onion is softened and translucent, about 2-3 minutes. Stir frequently to prevent the garlic from burning, as burnt garlic can impart a bitter flavor to the dish. As they sauté they should become translucent.
Step 5: Combine the filling ingredients. Stir in the cooked rice, drained diced tomatoes, Italian seasoning, salt, and pepper into the skillet with the ground beef and aromatics. Cook for 2-3 minutes, stirring occasionally, until all the ingredients are heated through and well combined. This step allows the flavors to meld together, creating a more cohesive and flavorful filling. Take time during this process to taste the mixture and adjust seasoning.
Step 6: Stuff the peppers. Carefully spoon the beef and rice mixture into the prepared bell peppers, filling them generously. Pack the filling down slightly to ensure that the peppers are fully stuffed. You want each one of the peppers to be full and round. You can heap the filling slightly above the top of the pepper, as it will settle during baking.
Step 7: Add the cheese. Top each stuffed bell pepper with a generous amount of shredded cheese. Ensure that the cheese covers the entire top of the filling. The cheese will melt and create a golden brown, bubbly topping. Use any cheese that you like.
Step 8: Bake the peppers. Cover the baking dish with foil to help steam the peppers and prevent them from drying out. Bake for 30 minutes. Then, remove the foil and bake for an additional 10-15 minutes, or until the peppers are tender and the cheese is melted, bubbly, and lightly browned. The baking time may vary depending on the size and thickness of the peppers. If the cheese is browning too quickly, you can loosely tent the baking dish with foil.
Step 9: Garnish and serve. Remove the stuffed bell peppers from the oven and let them cool for a few minutes before serving. Garnish with fresh chopped parsley for a pop of color and flavor. Serve immediately and enjoy!
COOKING Rating:
Easy
Serving Suggestions:
- Serve as a main course with a side salad or crusty bread.
- Accompany with roasted vegetables, such as broccoli, asparagus, or Brussels sprouts.
- Pair with a light soup, such as tomato soup or vegetable soup.
- Serve with a dollop of sour cream or Greek yogurt.
Tips:
- To save time, you can prepare the filling in advance and store it in the refrigerator for up to 24 hours.
- For a vegetarian option, substitute the ground beef with lentils, quinoa, or black beans.
- Add other vegetables to the filling, such as diced zucchini, carrots, or mushrooms.
- Spice things up by adding a pinch of red pepper flakes or a dash of hot sauce to the filling.
- If you don’t have Italian seasoning, you can use a combination of dried oregano, basil, and thyme.
- To prevent the peppers from tipping over, you can use a muffin tin to hold them in place during baking.
- Refrigerate leftover stuffed peppers in an airtight container for up to 3 days.
Prep Time:
20 minutes
Cook Time:
45 minutes
Total Time:
65 minutes
Nutritional Information:
(Estimated, per serving)
- Calories: 350
- Protein: 25g
- Sodium: 500mg
Conclusion
Classic Stuffed Bell Peppers are more than just a meal; they’re an experience. They embody the joy of home cooking, the satisfaction of a well-balanced plate, and the comfort of a familiar flavor. This recipe, with its simple steps and customizable ingredients, invites you to create your own family tradition. So gather your ingredients, preheat your oven, and prepare to be transported to a place where deliciousness and memories intertwine. The vibrant colors and enticing aromas will fill your kitchen, promising a meal that is both nourishing and soul-satisfying. Enjoy the process, savor the flavors, and share the warmth of these Classic Stuffed Bell Peppers with your loved ones.
Questions and Answers about this Recipe:
Q1: Can I use different types of rice in the filling?
A: Absolutely! While long-grain or medium-grain rice is typically recommended for its texture and ability to hold its shape, you can experiment with other varieties to suit your preferences. Brown rice adds a nuttier flavor and more fiber, while wild rice brings a unique earthy taste and slightly chewy texture. Quinoa is another excellent option, providing a protein-rich and gluten-free alternative. Just be sure to adjust the cooking time and liquid amount accordingly, as different types of rice may require different preparations. You could even try other grains like couscous or barley for a unique twist.
Q2: What can I do if my filling is too watery?
A: If your filling seems too watery, there are several ways to remedy the situation. First, ensure that you drain the diced tomatoes thoroughly before adding them to the filling. You can also add a thickening agent, such as a tablespoon of cornstarch or flour, to the skillet while cooking the filling. Alternatively, you can simmer the filling for a few extra minutes, allowing the excess liquid to evaporate. Another option is to add a starchy ingredient, like breadcrumbs or mashed potatoes, to absorb the moisture. Remember to taste and adjust the seasonings as needed after making any adjustments to the filling.
Q3: Can I freeze stuffed bell peppers for later?
A: Yes, stuffed bell peppers freeze exceptionally well, making them a great option for meal prepping. To freeze them, first, allow the baked peppers to cool completely. Then, individually wrap each pepper tightly in plastic wrap, followed by a layer of aluminum foil. Place the wrapped peppers in a freezer-safe bag or container. They can be stored in the freezer for up to 2-3 months. When ready to eat, thaw the peppers overnight in the refrigerator. Reheat them in the oven at 350°F (175°C) until heated through, or microwave them for a quicker option. Note that the texture of the peppers may be slightly softer after freezing and thawing, but the flavor will remain delicious.
Q4: How can I prevent the bell peppers from collapsing during baking?
A: Preventing the bell peppers from collapsing during baking is essential for maintaining their shape and presentation. There are a few strategies you can employ. First, choose firm, evenly shaped peppers that are sturdy enough to withstand the baking process. Trim the bottoms of the peppers slightly, if needed, to create a flat surface that allows them to stand upright. You can also use a muffin tin to support the peppers during baking, preventing them from tipping over. Finally, avoid overfilling the peppers, as this can put extra pressure on the sides and cause them to collapse.
Q5: What are some creative variations I can make to this recipe?
A: The possibilities for creative variations on this stuffed bell peppers recipe are endless! You can experiment with different protein sources, such as ground turkey, chicken, sausage, or even plant-based alternatives like lentils, beans, or tofu. Try incorporating different vegetables into the filling, such as diced zucchini, mushrooms, corn, or spinach. Add a touch of heat with a pinch of red pepper flakes or a dash of hot sauce. Experiment with different cheeses, such as pepper jack, provolone, or feta. And don’t forget the toppings! Top your stuffed peppers with sour cream, guacamole, salsa, or a sprinkle of fresh herbs for an extra burst of flavor. You can even add a layer of marinara sauce to the bottom of the baking dish before placing the peppers for a saucy twist.


