Description of this recipe
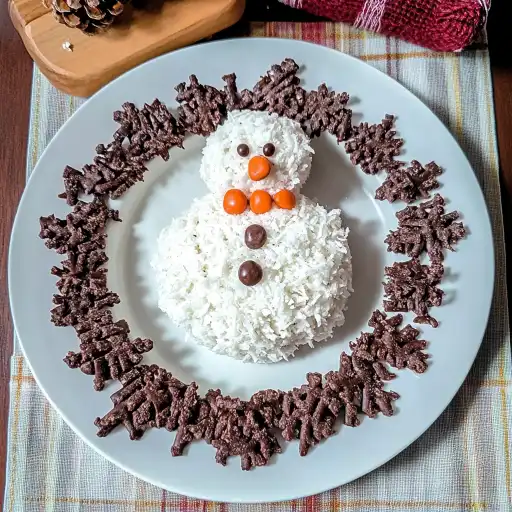
This Coconut Snowman Cheese Ball is a festive and delightful appetizer perfect for holiday gatherings. It’s a sweet and savory treat that combines the creamy richness of cream cheese with the tropical sweetness of coconut, all dressed up as an adorable snowman. This cheese ball is incredibly easy to make, requires no baking, and is guaranteed to be a crowd-pleaser. It’s a fun, interactive dish that both kids and adults will enjoy!
Why you will love this recipe
You’ll adore this Coconut Snowman Cheese Ball because it’s:
- Festive and Fun: It’s shaped like a snowman, making it perfect for Christmas parties, winter celebrations, or any snowy day gathering.
- Easy to Make: With just a few simple steps and no baking required, it’s a breeze to whip up.
- Deliciously Sweet and Savory: The combination of cream cheese, powdered sugar, and coconut creates a unique and irresistible flavor profile.
- Customizable: You can easily adapt the decorations and dippers to suit your preferences.
- A Conversation Starter: This adorable snowman is sure to be the talk of the party.
- Kid-Friendly: Children love to help decorate the snowman, making it a fun activity for the whole family.
- Make-Ahead Friendly: Prepare it in advance, so you have more time to enjoy the party.
- Perfectly Portable: Easy to transport, making it ideal for potlucks and get-togethers.
Ingredients:
Snowman Body:
- 16 oz full-fat cream cheese (2 bricks), softened
- ¾ cup powdered sugar
- ⅔ cup sweetened shredded coconut flakes
- 1 tsp coconut extract (optional, for a stronger coconut flavor)
Snowman Accessories:
- Candy rope or licorice, for the scarf
- 1 almond, for the nose
- 9-10 chocolate chips, for the eyes, smile, and buttons
Preparation:
Step 1: In a mixing bowl, combine the softened cream cheese and powdered sugar. If you’re using coconut extract, add it now. Softening the cream cheese is vital for ensuring a smooth, lump-free cheese ball. Leave the cream cheese at room temperature for at least an hour, or microwave it in short bursts (10-15 seconds) until softened but not melted.
Step 2: Using a hand mixer or stand mixer, beat the cream cheese mixture until it is light, fluffy, and well incorporated. This usually takes about 2-3 minutes. Ensure there are no lumps and that the powdered sugar is completely blended in. Scrape down the sides and bottom of the bowl with a rubber spatula to make sure everything is evenly mixed. This ensures a consistent flavor and texture throughout the cheese ball.
Step 3: Divide the cream cheese mixture into two portions. One portion should be about 1/3 of the mixture (for the snowman’s head), and the other should be about 2/3 of the mixture (for the snowman’s body). This proportion creates a visually appealing snowman shape with a slightly larger body.
Step 4: With a rubber spatula or large spoon, gently shape each portion into a roundish ball. It’s okay if the shapes aren’t perfect at this stage; they’ll be easier to refine once chilled. Place each portion in a separate section of the mixing bowl or transfer them to individual bowls. Cover the bowls with lids or wrap them tightly with plastic wrap or foil. Refrigerate the cream cheese balls for at least 1 hour, or preferably 2 hours. This chilling time allows the cheese balls to firm up, making them easier to handle and decorate.
Step 5: Take the chilled cream cheese portions out of the refrigerator. If you didn’t use plastic wrap, do this step with your hands. Roll the smaller portion (the head) into a smooth ball. Then, roll it in the shredded coconut, pressing gently to ensure the coconut adheres to the surface. Place the coconut-covered head on your serving platter. Repeat this process with the larger portion (the body). Attach the body to the head, pressing gently to secure them together.
Step 6: Gently flatten the cheese balls slightly to create a more stable base for your snowman. This prevents the snowman from rolling around on the platter and makes it easier to add the decorations.
Step 7: Decorate your snowman! Add chocolate chips to create the eyes, smile, and buttons. Use an almond for the nose, pressing it gently into the cream cheese. Take a piece of candy rope or licorice and tuck it behind the snowman’s neck to create a scarf. Secure it in place by pressing it gently into the cream cheese. Feel free to get creative with your decorations! You can use other candies, sprinkles, or edible markers to add personality to your snowman.
Step 8: Serve your Coconut Snowman Cheese Ball with your favorite dippers, such as graham crackers, vanilla wafers, pretzels, apple slices, or carrot sticks. You can also serve it with a variety of fruits, such as strawberries, grapes, or pineapple chunks.
COOKING Rating:
Easy
Serving Suggestions:
Serve with graham crackers, vanilla wafers, pretzels, apple slices, carrot sticks, strawberries, grapes, or pineapple chunks. Arrange the dippers artfully around the cheese ball on a platter.
Tips:
- Ensure the cream cheese is fully softened for a smooth cheese ball.
- Chill the cheese balls thoroughly before decorating.
- Get creative with the decorations to personalize your snowman.
- Make the cheese ball a day ahead for a stress-free party preparation.
- Store leftover cheese ball in the refrigerator for up to 3 days.
- For a savory version, omit the powdered sugar and coconut, and add shredded cheddar cheese, chopped green onions, and bacon bits.
- Use a variety of dippers to cater to different tastes.
Prep Time: 15 minutes
Cook Time: 0 minutes
Total Time: 1 hour 15 minutes (includes chilling time)
Nutritional Information:
(Estimates will vary based on specific ingredients used)
Calories: Approximately 200 calories per serving
Protein: Approximately 3 grams per serving
Sodium: Approximately 100 mg per serving
Conclusion:
This Coconut Snowman Cheese Ball is a delightful and festive addition to any holiday gathering. Its creamy, sweet, and savory flavor, combined with its adorable snowman appearance, makes it a guaranteed hit with guests of all ages. Easy to make and customizable, this cheese ball is a perfect way to spread some holiday cheer and create lasting memories. Whether you’re hosting a Christmas party, attending a potluck, or simply looking for a fun and festive snack, this Coconut Snowman Cheese Ball is sure to bring a smile to everyone’s face. So gather your ingredients, get creative with the decorations, and let the snowman magic begin!
Questions and Answers about this Recipe:
Q1: Can I make this cheese ball ahead of time?
A: Absolutely! In fact, it’s recommended. You can prepare the cheese ball up to 24 hours in advance. Wrap it tightly in plastic wrap and store it in the refrigerator. Add the decorations just before serving to prevent them from becoming soggy.
Q2: Can I use low-fat cream cheese?
A: While you can use low-fat cream cheese, the texture and flavor of the cheese ball will be slightly different. Full-fat cream cheese provides the best creamy texture and richness. If you do use low-fat, make sure it’s softened well to avoid a grainy texture.
Q3: What other decorations can I use?
A: Get creative! You can use mini M&Ms, colored sprinkles, pretzel sticks (for arms), gumdrops, or even edible glitter. Let your imagination run wild and personalize your snowman to your liking.
Q4: What if I don’t like coconut?
A: If you’re not a fan of coconut, you can omit it altogether and simply use the cream cheese and powdered sugar mixture. You can also try substituting the coconut with finely chopped nuts, such as pecans or walnuts, for a different flavor and texture. For a more savory option, consider omitting the powdered sugar and coconut and adding shredded cheddar cheese, bacon bits, and chopped green onions.
Q5: How long will the cheese ball last in the refrigerator?
A: The Coconut Snowman Cheese Ball will last in the refrigerator for up to 3 days. Make sure to wrap it tightly in plastic wrap to prevent it from drying out. However, the decorations may soften over time, so it’s best to add them just before serving if possible.