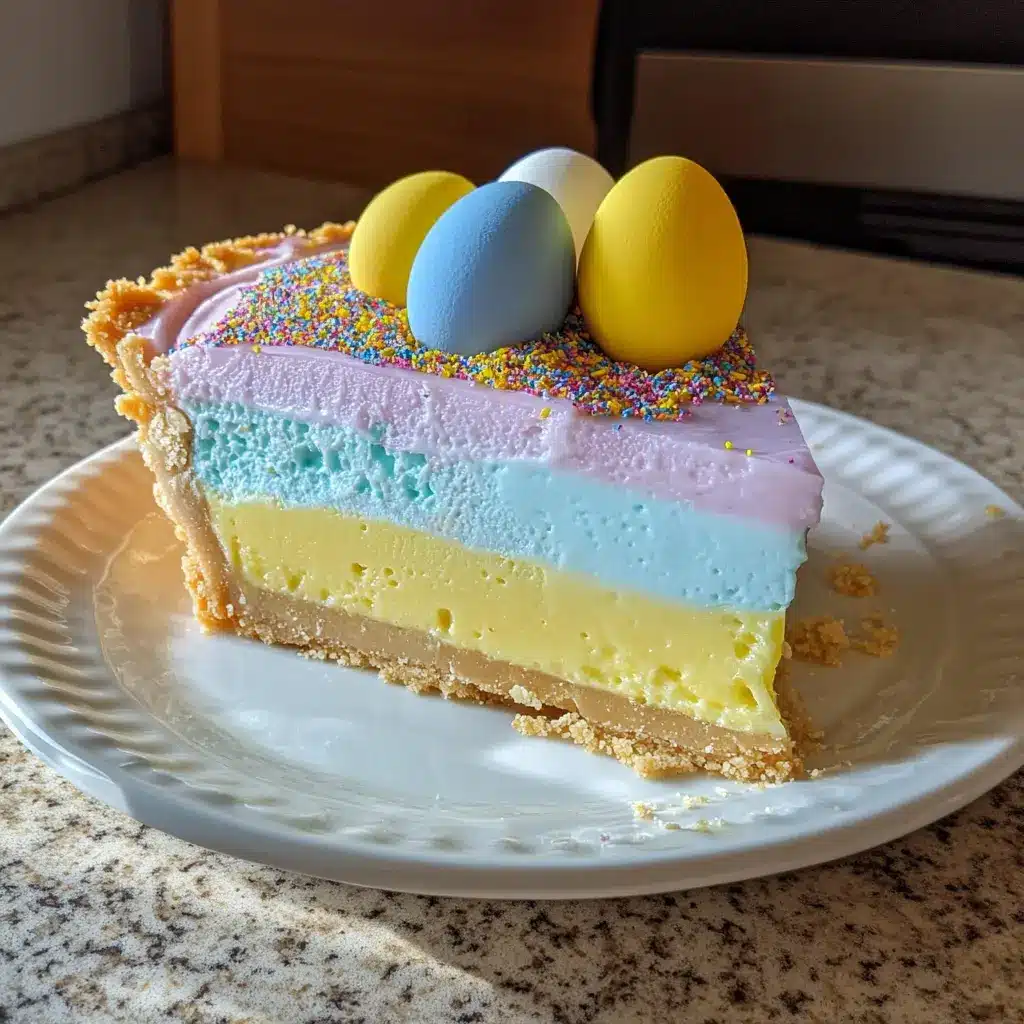
Description: This Easter Jell-O Pie is a vibrant and fun dessert that’s perfect for celebrating the spring season. Layers of colorful, creamy Jell-O filling sit atop a buttery graham cracker crust, creating a visually stunning and deliciously refreshing treat. It’s an easy make-ahead dessert that is sure to impress your family and friends!
Why You’ll Love This Recipe:
- Visually Stunning: The rainbow layers of Jell-O create a beautiful and festive presentation. This is a showstopper dessert that will catch everyone’s eye.
- Kid-Friendly: The bright colors and sweet flavors appeal to children, making it a perfect dessert for Easter egg hunts or kids’ parties. The soft texture is great for little mouths, too.
- Make-Ahead Dessert: This pie can be made well in advance, freeing up your time on the day of your celebration. Make it a day or two ahead and keep it chilled in the fridge!
- Customizable: You can easily adjust the colors and flavors to match your preferences or theme. Use different Jell-O flavors or add extracts for a unique twist.
- Easy to Make: Despite its impressive appearance, this pie is surprisingly simple to make, and doesn’t require advanced cooking skills.
Introduction
Easter is a time for celebrating new beginnings, and what better way to do that than with a vibrant and joyful dessert? The Easter Jell-O Pie is a playful twist on a classic dessert, transforming the traditional Jell-O mold into a colorful and creamy masterpiece. This recipe is perfect for anyone looking to add a touch of whimsy and fun to their Easter celebrations.
The inspiration for this recipe came from the desire to create a dessert that was both visually appealing and easy to prepare. The layers of colorful Jell-O not only look beautiful but also offer a delightful combination of flavors and textures. The graham cracker crust adds a subtle crunch that complements the creamy filling. You can adapt this recipe for any holiday or special occasion simply by changing out the colors of the Jell-O.
Ingredients:
Filling:
- ½ package Pink Starburst Jell-O (a little under 2 ounces)
- 1½ ounces Blue Jell-O (½ Package)
- 1½ ounces Yellow Jell-O (½ Package)
- 1½ ounces Purple Jell-O (½ Package)
- 16 ounces Whipped Cream, divided
- 3 cups Boiling Water
- 1 ⅓ cup Cold Water, divided
- Yellow Food Dye (optional)
- Pink Food Dye (optional)
Crust:
- 2 ½ cups Graham Cracker Crumbs
- 12 tablespoons Butter (1 ½ sticks), melted
Preparation:
Step 1: Prepare the Graham Cracker Crust
Begin by melting the butter in a microwave-safe bowl. Heat in 30-second intervals, stirring in between, until the butter is completely melted. Be careful not to overheat it, as this can affect the texture of the crust. Set aside to cool slightly.
In a medium-sized mixing bowl, combine the graham cracker crumbs and the melted butter. Mix well until the crumbs are evenly coated and the mixture resembles wet sand. The butter is what holds the crumbs together, forming a solid base for your pie. If you find that the mixture is too dry, you can add a tablespoon or two of melted butter at a time until the desired consistency is reached.
Step 2: Press the Crust into the Pan
Transfer the graham cracker crumb mixture into a 9-inch springform pan. Springform pans are ideal for this recipe because they allow you to easily remove the pie without damaging the delicate layers of Jell-O. Press the mixture firmly onto the bottom and up the sides of the pan, creating an even layer. Use the bottom of a measuring cup or your fingers to pack the crumbs tightly. Pay special attention to the edges of the crust to make sure they are well-formed and sturdy.
Step 3: Chill the Crust
Once the crust is pressed into the pan, place it in the freezer for at least 30 minutes. This will help the crust to set and harden, preventing it from crumbling when you add the Jell-O filling. Chilling the crust also helps to create a firmer base for the Jell-O layers, ensuring that they remain distinct and visually appealing.
Step 4: Prepare the Jell-O Mixtures
While the crust is chilling, prepare the Jell-O mixtures. In four separate small bowls, place each color of Jell-O powder (pink, blue, yellow, and purple). In each bowl, add ¾ cup of boiling water and stir until the Jell-O powder is completely dissolved and no grains remain on the bottom of the bowl. Ensure all granules are dissolved or the mixture will not set correctly and will affect the texture.
Next, add ⅓ cup of cold water to each bowl and stir once more. The cold water helps to cool the Jell-O mixture down slightly, preventing it from melting the whipped cream when you combine them later. Place the bowls of Jell-O in the refrigerator for about 20-30 minutes, or until they have slightly thickened but not completely solidified. The mixture should be viscous, similar to the consistency of honey.
Step 5: Combine Jell-O and Whipped Cream
Once the Jell-O mixtures have thickened, remove them from the refrigerator. Add 4 ounces of whipped cream to each bowl of Jell-O and gently mix until fully combined. It’s crucial to mix gently but thoroughly to ensure that the whipped cream is evenly distributed throughout the Jell-O mixture. This process creates a creamy and light texture that perfectly complements the fruity Jell-O flavors. If you are using food dye to enhance the colors, add a drop or two to the yellow and pink mixture, stirring until you reach your desired hue.
Step 6: Layer the Jell-O Filling
Remove the chilled crust from the freezer. Pour the first color of Jell-O mixture (e.g., yellow) into the crust and spread it evenly. Return the pie to the freezer for about 5 minutes to allow the first layer to set slightly. This will prevent the colors from mixing and ensure that each layer remains distinct.
Repeat this process with the remaining Jell-O colors, adding one layer at a time and freezing for 5 minutes between each layer. This methodical layering technique is essential for creating the vibrant rainbow effect that makes this pie so visually appealing.
Step 7: Chill the Pie
Once all the layers have been added, leave the pie in the freezer for at least 3-4 hours, or until completely solidified. To check if the pie is fully set, gently jiggle the pan. If the Jell-O filling is firm and doesn’t move, it’s ready to be served.
Step 8: Serve
Remove the pie from the freezer about 10 minutes before serving. If desired, top with additional whipped cream or other decorations. Carefully release the sides of the springform pan and transfer the pie to a serving plate. Slice and enjoy!
COOKING Rating:
Easy
Serving Suggestions:
- Serve chilled, straight from the refrigerator or freezer.
- Garnish with fresh berries or sprinkles for added visual appeal.
- Pair with a scoop of vanilla ice cream or a dollop of whipped cream.
- Serve as a refreshing dessert on a warm spring day.
Tips:
- Make sure the Jell-O is not completely set before mixing with whipped cream. It should be thickened but still pourable.
- For best results, use a high-quality whipped cream.
- If you don’t have a springform pan, you can use a regular pie dish. However, it may be more difficult to remove the pie without damaging it.
- Feel free to experiment with different Jell-O flavors and colors.
Prep Time:
30 minutes
Cook Time:
0 minutes
Total Time:
4 hours (including chilling time)
Nutritional Information:
(Note: The following is an estimate, actual values may vary based on ingredient brands and portion sizes.)
- Calories: Approximately 350 per slice
- Protein: 5g
- Sodium: 200mg
Conclusion
The Easter Jell-O Pie is a fun and festive dessert that’s perfect for celebrating the spring season. With its colorful layers and creamy texture, it’s sure to be a hit with both kids and adults alike. Give this recipe a try and add a touch of whimsy to your Easter celebrations!
Q&A:
Q1: Can I use sugar-free Jell-O for this recipe?
A: Yes, you can definitely use sugar-free Jell-O. The recipe will work just as well, and it’s a great way to reduce the sugar content of the dessert. Keep in mind that the flavor profile might be slightly different, but it should still be delicious.
Q2: What can I use instead of graham cracker crumbs for the crust?
A: If you’re not a fan of graham crackers or have dietary restrictions, you can use other types of crumbs. Vanilla wafer crumbs, shortbread crumbs, or even crushed Oreo cookies (without the filling) would work well. Just make sure to adjust the amount of butter accordingly to achieve the right consistency.
Q3: Can I make this pie without a freezer?
A: The freezer is crucial for setting each Jell-O layer quickly and ensuring that the colors don’t bleed into each other. If you don’t have a freezer, you can still make this pie, but it will take significantly longer to set. You’ll need to refrigerate each layer for at least 30-45 minutes before adding the next one.
Q4: Can I use homemade whipped cream instead of store-bought?
A: Absolutely! Homemade whipped cream will add an even richer and more decadent flavor to the pie. Just make sure to whip it to stiff peaks before folding it into the Jell-O mixtures. Homemade whipped cream tends to be less stable than store-bought, so it’s best to use it immediately.
Q5: How long can I store the Easter Jell-O Pie?
A: The Easter Jell-O Pie can be stored in the refrigerator for up to 3-4 days. Make sure to cover it tightly with plastic wrap to prevent it from drying out or absorbing odors from the refrigerator. The texture of the Jell-O might change slightly over time, but it will still be safe and delicious to eat.