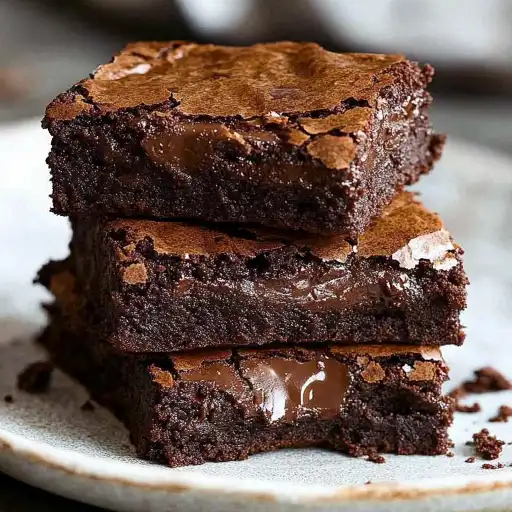
Description of this recipe: These aren’t just any brownies; they’re an experience. Rich, decadent, and intensely chocolatey, these brownies boast a perfectly fudgy center and a delicate, slightly chewy crust. This recipe is designed for ease and speed, making it ideal for busy weeknights or when you need a chocolate fix in a hurry. With simple ingredients and straightforward instructions, even novice bakers can achieve brownie perfection. Get ready to indulge in the ultimate comfort dessert!
Why you will love this recipe:
- Unbelievably Fudgy: The key to these brownies lies in the generous amount of dark chocolate and butter, creating a texture that melts in your mouth.
- Easy to Make: This recipe is designed to be foolproof, with simple instructions that even beginner bakers can follow.
- Quick to Prepare: From start to finish, these brownies can be ready in under an hour, making them perfect for those last-minute cravings.
- Customizable: Feel free to add your favorite nuts, chocolate chunks, or even a swirl of peanut butter for a personal touch.
- Intensely Chocolatey: The combination of dark chocolate chips, cocoa powder, and optional chopped chocolate creates a depth of flavor that will satisfy any chocolate lover.
Ingredients:
- 200g / 14 tbsp unsalted butter (1 3/4 US sticks)
- 200 g / 1 1/4 cups dark chocolate chips (7 oz)
- 1 cup (175g) brown sugar, loosely packed
- 3 eggs, lightly beaten
- 1 tsp vanilla extract
- 1/2 cup (75g) plain flour
- 1/4 cup (30g) cocoa powder
- Pinch of salt
- 180g/6oz dark chocolate block/bar (optional), chopped into chunks rather than shards, (bittersweet or semi-sweet, cooking chocolate)
- Alternative stir in: 1.5 cups roughly chopped walnuts (or other nuts)
Preparation:
Step 1: Preheat your oven to 180°C/350°F (160°C fan forced). This ensures that the brownies bake evenly and achieve that signature fudgy texture. Correct oven temperature is crucial for success.
Step 2: Prepare your baking pan. Spray a 20cm/8″ square tin with cooking oil spray and line it with baking/parchment paper, leaving an overhang on the sides. This makes it easy to lift the brownies out of the pan once they’ve cooled, preventing them from sticking. The overhang also creates clean edges.
Step 3: Melt the butter and chocolate. Place the butter and dark chocolate chips in a heatproof bowl. Microwave in 30-second bursts, stirring in between, until completely melted and smooth. Be careful not to overheat the chocolate, as it can seize and become grainy. A smooth, glossy mixture is what you’re aiming for. Alternatively, melt in a heatproof bowl over a pan of simmering water, ensuring the base of the bowl doesn’t touch the water.
Step 4: Combine wet ingredients. Add the brown sugar and vanilla extract to the melted chocolate mixture. Mix well until fully incorporated. The brown sugar adds a rich, molasses-like flavor and contributes to the fudgy texture. Next, add the lightly beaten eggs and mix until the batter is smooth and molten. Be careful not to overmix at this stage, as it can lead to tough brownies.
Step 5: Add dry ingredients. In a separate bowl, whisk together the plain flour, cocoa powder, and salt. This ensures that the dry ingredients are evenly distributed throughout the batter, preventing clumps and ensuring a consistent flavor. Add the dry ingredients to the wet ingredients and stir until just combined. Be careful not to overmix, as this can develop the gluten in the flour and result in tough brownies.
Step 6: Incorporate chocolate chunks (optional) and nuts. If you’re using chopped chocolate, gently fold it into the batter. This adds bursts of intense chocolate flavor and creates a more decadent texture. Similarly, if you’re adding nuts, fold them in at this stage.
Step 7: Bake. Pour the brownie batter into the prepared baking pan and spread it evenly. Bake for 24 minutes for really gooey brownies, 28 minutes for fudgey but still very moist (the sweet spot!), or 32 minutes for moist, fudge-cake-like brownies. The baking time will vary depending on your oven, so keep a close eye on them.
Step 8: Cool and cut. Remove the brownies from the oven and let them rest in the pan for 10 minutes before lifting them out using the parchment paper overhang. Allow them to cool completely for at least 20 minutes before cutting. This allows the brownies to set properly, making them easier to cut and preventing them from crumbling.
COOKING Rating:
Easy
Serving Suggestions:
- Serve warm with a scoop of vanilla ice cream for a classic dessert.
- Drizzle with melted chocolate or caramel sauce for an extra touch of indulgence.
- Sprinkle with powdered sugar for a simple yet elegant presentation.
- Enjoy with a cup of hot coffee or a glass of cold milk.
- Cut into squares and pack in lunchboxes for a delicious treat.
Tips:
- For even fudgier brownies, reduce the amount of flour by a tablespoon or two.
- If you don’t have brown sugar, you can use granulated sugar instead. However, the brown sugar adds a richer, more complex flavor.
- To prevent the brownies from sticking to the pan, make sure to grease and line it thoroughly with parchment paper.
- Don’t overbake the brownies, as they will become dry and crumbly. They should still be slightly soft in the center when you remove them from the oven.
- For clean cuts, use a sharp knife and wipe it clean between each slice.
Prep Time: 10 minutes
Cook Time: 24-32 minutes
Total Time: 34-42 minutes
Nutritional Information: (Estimates, will vary based on specific ingredients used)
- Calories: 350-450 per serving
- Protein: 4-6g per serving
- Sodium: 100-150mg per serving
Conclusion
These Easy Chocolate Brownies are a testament to the fact that you don’t need complicated techniques or fancy ingredients to create an extraordinary dessert. Their intensely chocolatey flavor, combined with their unbelievably fudgy texture, makes them a guaranteed crowd-pleaser. Whether you’re baking for a special occasion or simply craving a sweet treat, this recipe is sure to satisfy your cravings. So, gather your ingredients, preheat your oven, and get ready to experience brownie perfection! Enjoy the simple pleasure of creating something delicious and sharing it with loved ones. These brownies are more than just a dessert; they’re a symbol of comfort, joy, and the sweet moments in life.
Questions and Answers about this Recipe:
- Q: Can I use milk chocolate instead of dark chocolate?
- A: While you can use milk chocolate, keep in mind that it will result in a sweeter and less intense chocolate flavor. The dark chocolate is what gives these brownies their signature richness and depth. If you prefer a milder flavor, you can use a combination of milk and dark chocolate.
- Q: Can I make these brownies gluten-free?
- A: Yes, you can easily make these brownies gluten-free by substituting the plain flour with a gluten-free all-purpose flour blend. Make sure to choose a blend that is designed for baking and contains xanthan gum or another binding agent to help with the texture.
- Q: How do I store these brownies?
- A: Store the brownies in an airtight container at room temperature for up to 4 days. They can also be frozen for up to 3 months. To freeze, wrap the brownies individually in plastic wrap and then place them in a freezer-safe bag or container.
- Q: Can I add a frosting to these brownies?
- A: Absolutely! A simple chocolate ganache or a cream cheese frosting would be delicious on these brownies. Just make sure to let the brownies cool completely before frosting them.
- Q: How do I know when the brownies are done?
- A: The brownies are done when the edges are set and a toothpick inserted into the center comes out with moist crumbs attached. Be careful not to overbake them, as they will become dry and crumbly. Remember, a slightly gooey center is what makes these brownies so delicious!