Description of this recipe
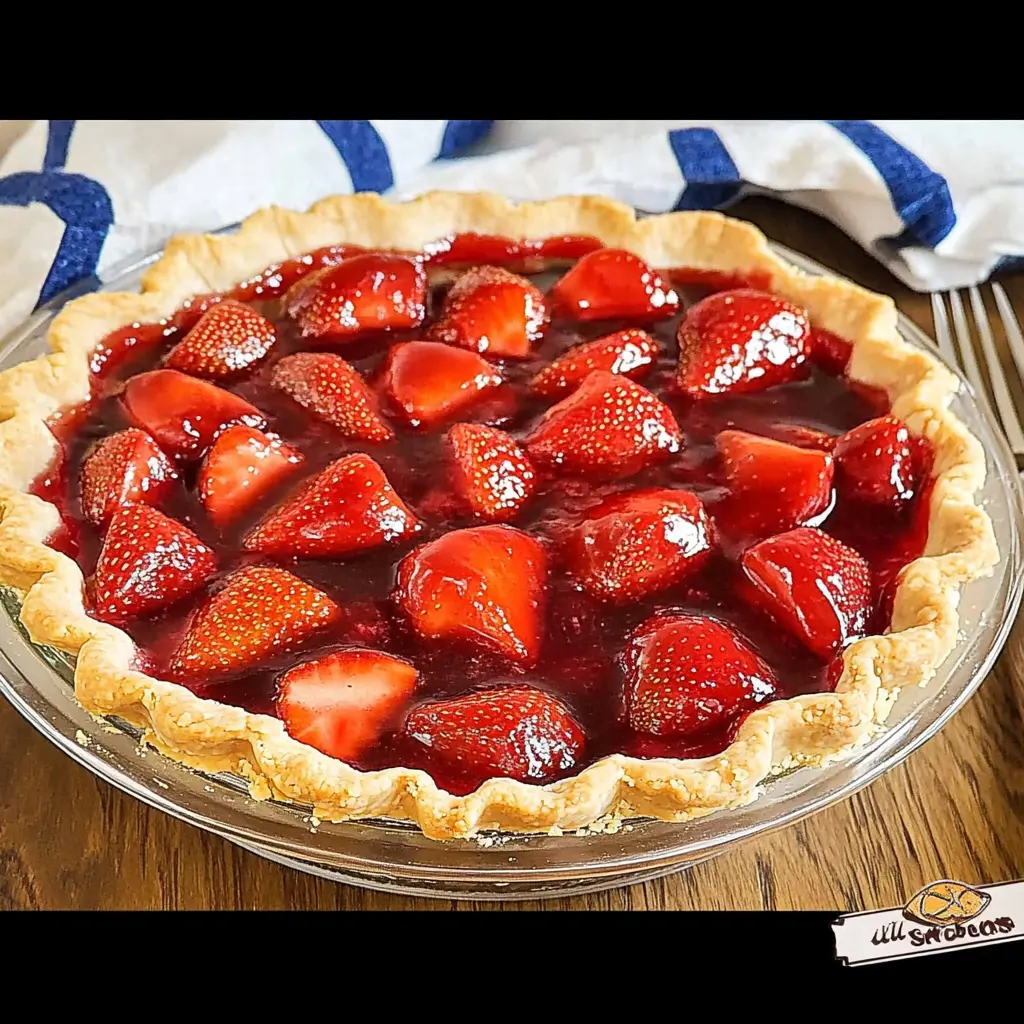
This Easy Fresh Strawberry Pie Recipe is the quintessential summer dessert. Bursting with the vibrant flavors of fresh, juicy strawberries, nestled in a perfectly baked, flaky crust, and topped with a light, sweet glaze, this pie is a crowd-pleaser that’s surprisingly simple to make. It’s the perfect dessert for picnics, barbecues, or any occasion where you want to celebrate the taste of summer.
Why you will love this recipe
You’ll absolutely fall in love with this strawberry pie for several reasons:
- Fresh and Flavorful: The star of this pie is undoubtedly the fresh strawberries. Their natural sweetness and slight tartness shine through, creating a truly delightful taste experience.
- Easy to Make: Despite its impressive presentation, this pie is incredibly easy to assemble. The glaze comes together quickly on the stovetop, and the rest is simply arranging the berries and chilling.
- No-Bake Filling: The filling requires no baking, making it a perfect dessert for hot summer days when you want to avoid turning on the oven.
- Customizable: You can easily adapt this recipe to your liking. Use different berries, add a touch of citrus zest to the glaze, or top with whipped cream for an extra touch of indulgence.
- Perfect for Any Occasion: Whether it’s a casual family gathering or a more formal celebration, this strawberry pie is always a welcome addition to the dessert table.
- Visually Stunning: The vibrant red strawberries arranged in a beautiful pattern make this pie a feast for the eyes as well as the palate. It’s sure to impress your guests.
- A Taste of Nostalgia: There’s something inherently nostalgic about strawberry pie. It evokes memories of summer days, family gatherings, and simple pleasures.
Ingredients:
- 6 cups whole strawberries, hulled
- 3/4 cup granulated sugar
- 3 tablespoons cornstarch
- 1/2 cup water
- 1 9-inch pie crust, baked
- 1 cup heavy whipping cream
- 2 tablespoons powdered sugar
Preparation:
Step 1: Prepare the Strawberries: Begin by hulling all 6 cups of strawberries. Select about 1 cup of the most ripe and juicy strawberries. Mash these strawberries using a fork or in a food processor until they form a smooth puree. Set the puree aside. The remaining 5 cups of strawberries will be used for the pie filling. Consider cutting the larger strawberries in half or even quarters so they arrange nicely in the pie crust.
Step 2: Make the Glaze: In a small saucepan, combine the granulated sugar and cornstarch. Whisk them together thoroughly to ensure there are no lumps of cornstarch. This is crucial to prevent a lumpy glaze. Add the water and the mashed strawberry puree to the saucepan. Stir well to combine all ingredients.
Step 3: Cook the Glaze: Place the saucepan over medium heat. Cook the mixture, stirring constantly with a whisk. It’s important to stir continuously to prevent the cornstarch from settling and burning on the bottom of the pan. Continue cooking until the mixture comes to a boil. Once it boils, continue stirring for another 3 minutes until the glaze thickens and becomes translucent. The glaze should be thick enough to coat the back of a spoon.
Step 4: Cool the Glaze: Remove the saucepan from the heat and let the glaze cool for about 10 minutes. This will prevent the glaze from melting the strawberries when you pour it over them. While the glaze is cooling, arrange the remaining whole strawberries in the baked pie crust. Arrange them in a circular pattern, starting from the outside and working your way towards the center. You can cut some of the larger berries in half to make them fit better and create a visually appealing design.
Step 5: Assemble the Pie: Pour the cooled glaze evenly over the arranged strawberries in the pie crust. Make sure that all the berries are coated with the glaze and that there are no dry spots remaining. Use a spoon or spatula to gently spread the glaze around to ensure even coverage.
Step 6: Chill the Pie: Cover the pie with plastic wrap, making sure the plastic wrap doesn’t touch the surface of the glaze. This will prevent a skin from forming on the glaze. Chill the pie in the refrigerator for at least 2-3 hours, or preferably overnight, to allow the glaze to set completely and the flavors to meld together.
Step 7: Prepare the Whipped Cream (Optional): While the pie is chilling, you can prepare the whipped cream topping. In a chilled bowl, beat the heavy whipping cream with an electric mixer until soft peaks form. Gradually add the powdered sugar and continue beating until stiff peaks form. Be careful not to overbeat the cream, or it will turn into butter.
Step 8: Serve the Pie: Once the pie is chilled and the glaze is set, remove it from the refrigerator. If desired, top the pie with the freshly whipped cream. Cut the pie into slices and serve immediately.
COOKING Rating:
Easy
Serving Suggestions:
- Serve chilled, plain or with a dollop of fresh whipped cream.
- A scoop of vanilla ice cream complements the strawberry flavor beautifully.
- Garnish with a sprig of mint for a touch of freshness.
- Serve with a glass of sparkling wine or lemonade for a refreshing summer treat.
- Pairs well with other summer desserts like grilled fruit or angel food cake.
Tips:
- Use the freshest, ripest strawberries you can find for the best flavor.
- Make sure the pie crust is completely cooled before adding the strawberries and glaze.
- If you’re short on time, you can use a store-bought graham cracker crust instead of a baked pie crust.
- For a richer glaze, add a tablespoon of butter to the saucepan along with the other ingredients.
- To prevent the pie crust from getting soggy, brush it with a thin layer of melted chocolate before adding the strawberries and glaze.
- If you don’t have cornstarch, you can use tapioca starch or arrowroot powder as a substitute.
- Store leftover pie in the refrigerator for up to 3 days.
Prep Time:
20 minutes
Cook Time:
5 minutes
Total Time:
2 hours 25 minutes (includes chilling time)
Nutritional Information:
(Note: Nutritional information is an estimate and may vary based on specific ingredients and serving size.)
Calories:
Approximately 300-350 per slice
Protein:
Approximately 3-4 grams per slice
Sodium:
Approximately 150-200 mg per slice
Conclusion
This Easy Fresh Strawberry Pie is a delightful dessert that captures the essence of summer. With its vibrant flavors, easy preparation, and stunning presentation, it’s sure to become a family favorite. Whether you’re celebrating a special occasion or simply craving a sweet treat, this pie is the perfect choice. The combination of fresh strawberries, a sweet glaze, and a flaky crust is simply irresistible. So, gather your ingredients, follow the simple steps, and get ready to enjoy a slice of summer paradise!
Questions and Answers:
Q1: Can I use frozen strawberries for this recipe?
A: While fresh strawberries are highly recommended for the best flavor and texture, you can use frozen strawberries in a pinch. However, make sure to thaw them completely and drain any excess liquid before using them. Frozen strawberries tend to be softer than fresh ones, so they may not hold their shape as well in the pie. I would recommend only using fresh.
Q2: Can I make this pie ahead of time?
A: Absolutely! In fact, it’s best to make this pie at least a few hours in advance to allow the glaze to set completely. You can even make it the day before you plan to serve it. Just make sure to store it covered in the refrigerator.
Q3: Can I use a different type of crust?
A: Yes, you can definitely experiment with different types of crust. A graham cracker crust is a popular alternative, and it adds a nice crumbly texture to the pie. You can also use a shortbread crust or even a gluten-free crust if you have dietary restrictions.
Q4: Can I add other fruits to this pie?
A: While this recipe is specifically for strawberry pie, you can certainly add other berries to the mix. Raspberries, blueberries, or blackberries would all be delicious additions. Just make sure to adjust the amount of sugar in the glaze accordingly, depending on the sweetness of the other fruits.
Q5: My glaze is too thick/too thin. What did I do wrong?
A: The consistency of the glaze depends on the ratio of cornstarch to liquid. If your glaze is too thick, it means you may have used too much cornstarch or cooked it for too long. Try adding a little more water to thin it out. If your glaze is too thin, it means you may not have used enough cornstarch or didn’t cook it long enough. Try cooking it for a few more minutes, stirring constantly, until it thickens. Make sure to measure ingredients correctly for best results.