Description of this recipe
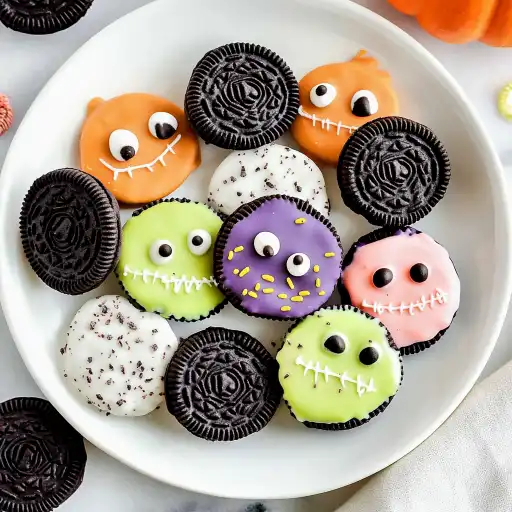
These Halloween Chocolate Covered Oreos are a fun and festive treat perfect for parties, gifting, or simply enjoying a spooky season snack. This recipe offers a creative way to dress up classic Oreos with colorful candy melts, sprinkles, and edible eyeballs, transforming them into adorable monsters, mummies, and bats. Whether you’re a seasoned baker or a beginner, these decorated Oreos are easy to make and endlessly customizable.
Why you will love this recipe
You’ll love this recipe for its simplicity and versatility. It’s a fantastic activity to do with kids, allowing them to express their creativity through decorating. The combination of rich chocolate and crunchy Oreo cookies is always a crowd-pleaser, and the festive Halloween designs add an extra touch of whimsy. Plus, these treats are incredibly easy to transport and store, making them ideal for parties and gatherings. The visual appeal of these decorated Oreos is undeniable, making them a standout dessert on any Halloween spread.
Ingredients:
- 25 Oreo cookies (about 1 package of regular or double stuffed Oreos. Double stuffed Oreos work best for the bats)
- 2 cups candy melts (To replicate my designs, I used 1/2 cup each of black, white, purple, and green melts)
- 2 teaspoons coconut oil
- Halloween sprinkles
- Candy eyeballs
- Optional: granulated or coarse sugar
Preparation:
Before you start, gather all your ingredients and set up your workstation. Line a baking sheet with parchment paper to prevent the Oreos from sticking. Ensure your candy melts and coconut oil are readily available, and prepare your sprinkles and candy eyeballs in small bowls for easy access. For the bat design, have a few extra Oreos on hand to create the wings.
Step 1:
Melt the Candy Melts: Working with one color at a time, add 1/2 cup of candy melts to a small, microwave-safe bowl along with 1/2 teaspoon of coconut oil. Melt the candy melts in the microwave in 30-second intervals, stirring well after each interval to prevent burning. Continue until the candy melts are smooth and fully melted. The coconut oil helps to create a smoother consistency and a glossy finish.
Step 2:
Dip the Oreos: Take one Oreo at a time and carefully dip it into the melted candy melts, ensuring it is fully coated on all sides. Use a fork or dipping tool to flip the Oreo, making sure every part is covered. The key is to work quickly, as the candy melts can start to set.
Step 3:
Remove Excess Coating: Gently lift the dipped Oreo from the melted candy using a fork. Lightly shake off any excess coating to create a smooth and even surface. This step is important for achieving a professional look and preventing the coating from being too thick.
Step 4:
Decorate: Place the dipped Oreo onto the parchment-lined baking sheet. Immediately decorate the Oreo with Halloween sprinkles and candy eyeballs. For the Monster design, use green or purple candy melts and arrange the eyeballs on each cookie before sprinkling with festive Halloween sprinkles. For the Mummies design, dip each cookie in white candy melts, add the eyeballs, and then transfer the remaining melted candy to a piping bag. Cut a small opening in the tip of the bag and pipe thin stripes across the cookie to resemble mummy wrappings, being careful not to cover the eyes. For the Bats design, use black candy melts, insert the Oreo “wings” into the double-stuffed filling, arrange the candy eyeballs, and optionally sprinkle the bat bodies with granulated or coarse sugar for added texture.
Step 5:
Set the Cookies: Allow the decorated Oreos to set completely at room temperature. This usually takes about an hour. You can speed up the process by placing the baking sheet in the refrigerator for 15-20 minutes. Once the candy coating is firm, the Halloween Chocolate Covered Oreos are ready to serve.
COOKING Rating:
- Ease of Preparation: 5/5 (Very easy)
- Kid-Friendly: 5/5 (Great for kids to help decorate)
- Taste: 4/5 (Classic Oreo with a chocolatey twist)
- Festiveness: 5/5 (Perfect for Halloween)
- Overall: 4.8/5
Serving Suggestions:
These Halloween Chocolate Covered Oreos are perfect for serving at Halloween parties, school events, or as a spooky snack for trick-or-treaters. Arrange them on a decorative platter or place them in individual treat bags for gifting. They also make a delightful addition to a Halloween-themed dessert table. Pair them with other festive treats like pumpkin spice cookies or candy corn for a complete Halloween experience.
Tips:
- Use double stuffed Oreos, especially for the bat design, as they hold the wings in place better.
- Work with one color of candy melts at a time to prevent them from hardening.
- If the candy melts become too thick, add a tiny bit more coconut oil.
- Use a piping bag for detailed decorations like the mummy wrappings.
- Get creative with your decorations! Use different colored sprinkles, edible glitter, or other candies to customize your designs.
- Store the decorated Oreos in an airtight container at room temperature to maintain their freshness.
- For the bat wings, be gentle when snapping the extra Oreos in half to avoid breaking them into too many pieces.
- If you don’t have candy melts, you can use chocolate chips with a bit of shortening for a similar effect.
Prep Time: 20 minutes
Cook Time: 10 minutes
Total Time: 30 minutes (plus 1 hour to set)
Nutritional Information: (per cookie, approximate)
Calories: 150 kcal
Protein: 1 g
Sodium: 70 mg
Conclusion
These Halloween Chocolate Covered Oreos are a delightful and easy way to celebrate the spooky season. With just a few simple ingredients and a little creativity, you can transform ordinary Oreos into festive treats that everyone will love. Whether you’re making them for a party, a school event, or just for fun, these decorated Oreos are sure to be a hit. The versatility of this recipe allows you to customize the designs to your liking, making each batch unique and special. So gather your supplies, put on some Halloween music, and get ready to create some spooktacular treats!
Questions and Answers about this recipe
Q1: Can I use regular chocolate instead of candy melts?
A1: Yes, you can use regular chocolate, but candy melts are recommended because they melt smoothly and set firmly without needing to be tempered. If you use chocolate chips, add a small amount of shortening (about 1 teaspoon per cup of chocolate) to help it melt smoothly and prevent it from seizing. Be aware that regular chocolate may not harden as quickly or as firmly as candy melts.
Q2: How do I prevent the candy melts from seizing?
A2: To prevent candy melts from seizing, avoid overheating them and make sure no water or steam gets into the melted candy. Melt the candy in the microwave in short intervals (30 seconds at a time), stirring well after each interval. If the candy melts start to become thick, add a small amount of coconut oil (1/2 teaspoon at a time) to help smooth them out.
Q3: Can I make these ahead of time?
A3: Yes, you can definitely make these ahead of time. The decorated Oreos can be stored in an airtight container at room temperature for up to a week. Make sure they are fully set before storing them to prevent smudging the decorations. This makes them a great option for party planning, as you can prepare them in advance and have them ready to go when needed.
Q4: What can I use if I don’t have double stuffed Oreos for the bat wings?
A4: If you don’t have double stuffed Oreos, you can still make the bat wings, but they may not hold as securely. Try using a small amount of melted candy melts as “glue” to attach the Oreo wings to the sides of the regular Oreos. Alternatively, you could use other candies or decorations to create the wings, such as chocolate-covered pretzels or licorice pieces.
Q5: Can I freeze these decorated Oreos?
A5: While you can technically freeze these decorated Oreos, it is not recommended as freezing can affect the texture and appearance of the candy melts and the Oreo cookies. The candy melts may become discolored or develop a slightly grainy texture. If you do choose to freeze them, wrap them tightly in plastic wrap and store them in an airtight container. Thaw them in the refrigerator before serving to minimize condensation. However, for best results, it’s better to make them fresh or store them at room temperature.