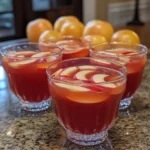
Description: These Ice Cream Sundae Cupcakes are a delightful twist on the classic dessert. They bring together the familiar flavors of vanilla cupcakes, creamy frosting, rich chocolate syrup, whipped cream, colorful sprinkles, and a bright maraschino cherry on top. These cupcakes are a playful, fun, and utterly delicious treat for any occasion, perfect for kids and adults alike!
Why You Will Love This Recipe:
- Nostalgic Charm: It’s like having your favorite ice cream sundae in cupcake form, evoking fond childhood memories.
- Easy to Make: The recipe is straightforward and doesn’t require any complicated techniques.
- Customizable: You can easily adjust the flavors and toppings to suit your preferences, making each cupcake unique.
- Crowd-Pleaser: These cupcakes are guaranteed to be a hit at parties, gatherings, or even just as a special treat for your family.
- Fun for All Ages: Making and decorating these cupcakes is a great activity to do with kids.
Introduction
Ice cream sundaes are a timeless treat, bringing smiles to faces young and old. But what if you could capture all that fun and flavor in a single, adorable cupcake? That’s exactly what this recipe aims to do! These Ice Cream Sundae Cupcakes aren’t just cupcakes; they’re a celebration of joy and deliciousness, a sweet escape into a world of sprinkles, chocolate, and creamy delight.
Imagine the look on your kids’ faces when they see these miniature sundaes. Or the delight of your friends as they bite into a cupcake that tastes just like their favorite childhood dessert. These cupcakes are perfect for birthday parties, summer barbecues, or simply as a sweet surprise on a rainy afternoon.
The base of these cupcakes is a light and fluffy vanilla cupcake, simple yet essential. It provides the perfect canvas for the symphony of flavors that comes next. The frosting is a creamy, buttery delight, acting as the “ice cream” of our sundae. Then comes the fun part: the toppings! A generous drizzle of chocolate syrup, a dollop of whipped cream, a sprinkle of colorful confetti, and the crowning glory, a bright red maraschino cherry. It’s a feast for the eyes and the taste buds.
What sets these cupcakes apart is their ability to capture the essence of an ice cream sundae without the mess. No melting ice cream dripping down your hands, just pure, unadulterated joy in every bite. They’re also incredibly versatile. Feel free to experiment with different flavors of cupcakes, frostings, and toppings to create your own signature sundae cupcake. Think strawberry cupcakes with vanilla frosting and fresh strawberries, or chocolate cupcakes with peanut butter frosting and chopped peanuts. The possibilities are endless!
So, grab your mixing bowls, preheat your oven, and get ready to embark on a sweet adventure. These Ice Cream Sundae Cupcakes are sure to bring a touch of whimsy and a whole lot of deliciousness to your day.
Ingredients:
For the Cupcakes:
- 1 1/2 cups all-purpose flour
- 1 1/2 tsp baking powder
- 1/4 tsp salt
- 1/2 cup unsalted butter, softened
- 1 cup granulated sugar
- 2 large eggs
- 1 tsp vanilla extract
- 1/2 cup whole milk
For the Frosting:
- 1/2 cup unsalted butter, softened
- 2 cups powdered sugar
- 2 tbsp heavy cream
- 1 tsp vanilla extract
For Topping:
- 1 cup whipped cream (either homemade or store-bought)
- Chocolate syrup
- Sprinkles
- Maraschino cherries
Preparation:
Step 1: Preheat Oven & Prepare Muffin Tin
Preheat your oven to 350°F (175°C). Place cupcake liners into a 12-count muffin tin. This ensures your cupcakes bake evenly and come out of the pan easily. Make sure the cupcake liners are securely in place to avoid any batter leakage. Setting the oven temperature correctly is crucial for achieving the perfect cupcake texture.
Step 2: Combine Dry Ingredients
In a medium bowl, whisk together the all-purpose flour, baking powder, and salt. Whisking is essential to ensure the baking powder and salt are evenly distributed throughout the flour, which will help the cupcakes rise properly and have a uniform texture. Sifting the flour beforehand can also prevent clumps and create a lighter cupcake.
Step 3: Cream Butter and Sugar
In a separate, large mixing bowl, cream the softened butter and granulated sugar together using an electric mixer on medium speed. Beat for about 3-5 minutes, or until the mixture is light, fluffy, and pale in color. This creaming process incorporates air into the batter, which is vital for creating a tender and airy cupcake. Scrape down the sides of the bowl occasionally to ensure all ingredients are evenly combined.
Step 4: Add Eggs and Vanilla Extract
Add the eggs one at a time to the creamed butter and sugar mixture, beating well after each addition. This ensures that each egg is fully incorporated into the batter. Then, add the vanilla extract and mix until combined. Vanilla extract enhances the flavor of the cupcakes and adds a warm, inviting aroma.
Step 5: Alternate Adding Dry and Wet Ingredients
Gradually add the flour mixture to the wet ingredients, alternating with the whole milk. Begin and end with the flour mixture. Add a third of the flour mixture, mix until just combined, then add half of the milk, mix, then another third of the flour mixture, mix, add the remaining milk, mix, and finally add the remaining flour mixture. Be careful not to overmix, as this can develop the gluten in the flour, resulting in tough cupcakes. Mix until just combined. Overmixing can lead to a dense, less tender cupcake.
Step 6: Fill Cupcake Liners
Divide the cupcake batter evenly among the prepared cupcake liners, filling each about 2/3 full. Using an ice cream scoop can help ensure that each cupcake is filled with the same amount of batter. This will ensure uniform baking and consistent-sized cupcakes.
Step 7: Bake Cupcakes
Bake in the preheated oven for 18-20 minutes, or until a toothpick inserted into the center of a cupcake comes out clean. The baking time may vary depending on your oven, so it’s important to check the cupcakes for doneness. If the tops of the cupcakes are browning too quickly, you can loosely tent them with foil.
Step 8: Cool Cupcakes
Remove the cupcakes from the muffin tin and place them on a wire rack to cool completely before frosting. Cooling the cupcakes completely prevents the frosting from melting and ensures that the cupcakes hold their shape.
Step 9: Prepare the Frosting
While the cupcakes are cooling, prepare the frosting. In a large mixing bowl, beat the softened butter until creamy. Gradually add the powdered sugar, beating on low speed until combined. Then, add the heavy cream and vanilla extract. Increase the mixer speed to medium-high and beat until the frosting is light, fluffy, and smooth. If the frosting is too thick, add a little more heavy cream. If it’s too thin, add a little more powdered sugar.
Step 10: Frost the Cupcakes
Once the cupcakes are completely cooled, frost each cupcake generously with the prepared frosting. You can use a piping bag for a decorative swirl or simply spread the frosting with a knife or spatula.
Step 11: Add Toppings
Drizzle each frosted cupcake with chocolate syrup, add a dollop of whipped cream, and top with sprinkles and a maraschino cherry. Get creative with your toppings and let your imagination run wild!
COOKING Rating: Easy
Serving Suggestions:
- Serve these cupcakes at birthday parties, picnics, or any special occasion.
- Pair them with a scoop of ice cream for an extra indulgent treat.
- Offer a variety of toppings to allow guests to customize their own cupcakes.
- These cupcakes are best served the same day they are made, but they can be stored in an airtight container in the refrigerator for up to 2 days.
Tips:
- Make sure the butter is softened for both the cupcakes and the frosting for the best results.
- Don’t overmix the cupcake batter, as this can result in tough cupcakes.
- Cool the cupcakes completely before frosting to prevent the frosting from melting.
- Get creative with your toppings and experiment with different flavors and colors.
- For a more intense chocolate flavor, add a tablespoon of cocoa powder to the cupcake batter.
- If you don’t have heavy cream, you can use whole milk instead.
- For a vegan version, use plant-based butter, milk, and whipped cream alternatives.
Prep Time: 20 minutes
Cook Time: 18-20 minutes
Total Time: 1 hour (includes cooling time)
Nutritional Information:
(Note: Nutritional information is an estimate and may vary based on specific ingredients and serving sizes.)
Calories: Approximately 350 per cupcake
Protein: 3g
Sodium: 150mg
Conclusion
These Ice Cream Sundae Cupcakes are more than just a dessert; they’re a celebration of fun, flavor, and creativity. They’re easy to make, customizable, and guaranteed to bring a smile to everyone’s face. Whether you’re hosting a party or simply want to indulge in a sweet treat, these cupcakes are the perfect choice. So, gather your ingredients, put on your apron, and get ready to create a batch of these delightful miniature sundaes. You won’t be disappointed!
Questions and Answers
Q1: Can I make these cupcakes ahead of time?
A: Absolutely! You can bake the cupcakes a day ahead of time and store them in an airtight container at room temperature. However, it’s best to frost and decorate them just before serving to prevent the toppings from becoming soggy. You can also make the frosting a day in advance and store it in the refrigerator. Just be sure to bring it to room temperature and re-whip it before using.
Q2: Can I use a different type of frosting?
A: Of course! While this recipe calls for a classic vanilla buttercream frosting, you can easily substitute it with your favorite frosting. Cream cheese frosting, chocolate frosting, or even a simple glaze would all work well. You can also experiment with different flavors of buttercream, such as strawberry, lemon, or coffee.
Q3: What if I don’t have cupcake liners?
A: If you don’t have cupcake liners, you can grease and flour the muffin tin instead. Be sure to grease the entire tin thoroughly with butter or cooking spray, then dust it with flour, tapping out any excess. This will prevent the cupcakes from sticking to the tin. You can also use silicone muffin cups, which don’t require any greasing or flouring.
Q4: Can I use different toppings?
A: Absolutely! The toppings are where you can really get creative and customize these cupcakes to your liking. In addition to chocolate syrup, whipped cream, sprinkles, and maraschino cherries, you can use chopped nuts, mini chocolate chips, caramel sauce, crushed Oreos, fresh fruit, or any other toppings you enjoy.
Q5: Are these cupcakes suitable for people with dietary restrictions?
A: With a few modifications, these cupcakes can be made suitable for people with certain dietary restrictions. For a gluten-free version, use a gluten-free all-purpose flour blend. For a vegan version, use plant-based butter, milk, and whipped cream alternatives, and ensure that the sugar you use is processed without bone char. Always double-check all ingredient labels to ensure they meet your specific dietary needs.