Description of this recipe
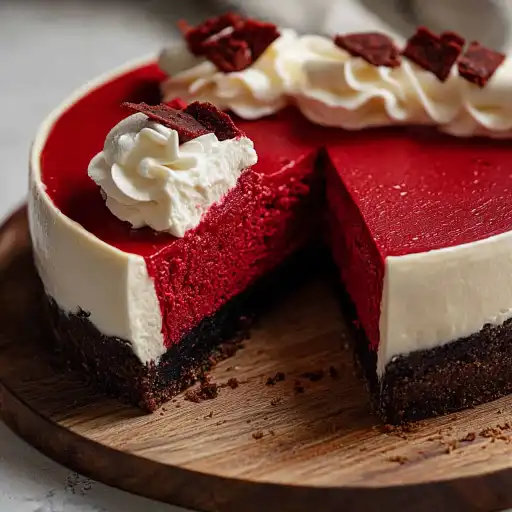
Indulge in the decadent allure of Red Velvet Cheesecake, a captivating dessert that marries the classic charm of red velvet cake with the creamy richness of cheesecake. This stunning treat boasts a velvety smooth texture, a vibrant red hue, and a tantalizing flavor profile that’s both sweet and subtly tangy. Perfect for special occasions or any moment you crave a touch of elegance, this cheesecake is guaranteed to impress.
Why you will love this recipe
This Red Velvet Cheesecake is a showstopper for several reasons:
- Visually stunning: The deep red color contrasted with the creamy white topping creates a beautiful presentation.
- Delicious flavor combination: The slightly tangy cheesecake filling complements the subtle chocolate notes of the red velvet, creating a balanced and irresistible taste.
- Luxurious texture: The creamy smooth cheesecake filling and the light, airy whipped cream topping offer a delightful textural contrast.
- Impressive but achievable: While it looks intricate, this recipe is surprisingly straightforward, making it a rewarding baking project for both novice and experienced bakers.
- Perfect for celebrations: It’s the ideal dessert for holidays, birthdays, or any special occasion that calls for a memorable treat.
Ingredients:
Cups
Metric
Base:
- 200g/ 7oz Oreo cookies (1.5 standard packs, Note 1)
- 60g / 4 tbsp unsalted butter , melted
Red velvet cheesecake filling:
- 2 tsp gelatine powder (unflavoured gelatine) (Note 2)
- 2 tbsp water
- 1 cup heavy/thickened cream , fridge cold
- 500g / 1 lb cream cheese , softened (block form, Note 3)
- 3/4 cup caster sugar / superfine sugar (Note 4)
- 1 tsp vanilla extract
- 150g / 5 oz 70% chocolate (or dark chocolate) , chopped and melted, then cooled 3 minutes until lukewarm but no lumps at all (Note 5)
- 6 tsp red food colouring (Note 6) – UK readers especially!
Whipped cream topping:
- 1 1/4 cups heavy/thickened cream , fridge cold (for whipping)
- 3 tbsp caster sugar / superfine sugar
- 1 tsp vanilla extract
- Optional – stabilise the cream so it doesn’t deflate – see here for directions
Chocolate topping:
- 2 tbsp shaved or grated dark chocolate (I use a potato peeler, grater also works)
Preparation:
Step 1: Prepare the Pan
Flip the base of a 20cm / 8″ springform pan upside down – this makes it easier to remove the finished cheesecake without the lip in the way. Very lightly butter the pan base, then press on a square sheet of baking paper. Clip the pan sides onto the base, letting the excess paper stick out the sides (for easy removal later). Butter and line the pan sides with more baking paper. This ensures the cheesecake releases cleanly after baking.
Step 2: Make the Oreo Biscuit Base
Roughly break up Oreos with your hands and place them in a food processor. Pulse until they become fine crumbs. Add the melted butter, then pulse again until combined. The mixture should resemble wet sand.
Step 3: Press the Base into the Pan
Transfer the Oreo crumbs into the prepared pan, pressing evenly and firmly onto the base. Use the underside of a straight-sided, flat-bottomed cup measure to help achieve an even and compact base. This provides a sturdy foundation for the cheesecake filling.
Step 4: Bloom the Gelatine
Place the water in a small bowl, then sprinkle the gelatine powder across the surface. Stir to partly dissolve. Set aside for 5 minutes. It will turn into a solid rubber; this process is called blooming. Microwave the gelatine for 15 seconds to turn it into liquid, stir, then let it stand for 3 to 5 minutes to cool. It MUST be liquid when added into the mixture (else you’ll end up with gelatine lumps), so re-melt if needed. Blooming the gelatine hydrates it, ensuring it dissolves properly and creates a smooth texture in the cheesecake.
Step 5: Whip the Cream
In a large bowl, whip the heavy cream until stiff peaks form (2 – 3 minutes on high with an electric mixer). Be careful not to overwhip, as this can turn the cream into butter. Set aside.
Step 6: Whip the Cream Cheese
In a separate bowl (no need to clean the beaters), beat the softened cream cheese and caster sugar for 2 minutes on high speed until fluffy and smooth. Ensuring the cream cheese is properly softened is crucial for a lump-free cheesecake.
Step 7: Incorporate the Gelatine and Vanilla
Add the cooled, liquid gelatine and vanilla extract to the cream cheese mixture. Beat for another 30 seconds to mix everything through well.
Step 8: Add Chocolate and Red Food Colouring
Add the lukewarm melted chocolate and red food colouring to the cream cheese mixture. Beat well for 1 minute until well combined. The mixture should be a dark, seductive scarlet red colour rather than bright red, bearing in mind the cream will lighten it a bit. Adjust the amount of red food colouring to achieve your desired hue.
Step 9: Fold in the Whipped Cream
Add one third of the whipped cream to the cream cheese mixture and gently fold until just combined. Then, fold in the remaining whipped cream. Be gentle when folding to avoid deflating the cream, which will result in a denser cheesecake.
Step 10: Transfer to Cake Pan
Pour the mixture into the prepared tin and place in the fridge for at least 6 hours to set, or preferably overnight. This allows the cheesecake to fully set and develop its flavor.
Step 11: Remove Cheesecake
Release the sides of the springform pan. Use the paper to slide the cheesecake off the base onto a serving platter. Peel the paper off the sides, then slide the paper out from under the cake.
Step 12: Whip Cream Topping
Place the heavy cream, caster sugar, and vanilla extract in a bowl. Beat on high speed for 2 minutes until softly whipped. Be careful not to overwhip. (See here for make-ahead stabilised whipped cream option).
Step 13: Decorate
Pile the whipped cream on the cheesecake in the middle, leaving a 2.5cm/1″ border. Sprinkle with shaved chocolate. Serve and enjoy!
COOKING Rating:
Intermediate
Serving Suggestions:
- Serve chilled, straight from the refrigerator.
- Pair with fresh berries, such as raspberries or strawberries, for a burst of freshness.
- Drizzle with chocolate sauce or a raspberry coulis for an extra touch of decadence.
- Enjoy with a cup of coffee or tea.
Tips:
- Ensure your cream cheese is properly softened for a smooth, lump-free filling.
- Use gel food colouring for the most vibrant red colour. Liquid food colouring may require more to achieve the desired shade and could affect the consistency of the cheesecake.
- Don’t overbake the cheesecake, as it will continue to set as it cools.
- Allow the cheesecake to cool completely before refrigerating to prevent condensation from forming on the surface.
- For a cleaner cut, dip a sharp knife in hot water and wipe it clean between slices.
Prep Time:
30 minutes
Cook Time:
0 minutes (chilling time is 6 hours or overnight)
Total Time:
6 hours 30 minutes (including chilling time)
Nutritional Information:
Note: Nutritional information is an estimate and may vary based on specific ingredients and portion sizes.
Calories:
Approximately 450-550 per serving
Protein:
Approximately 8-10g per serving
Sodium:
Approximately 200-250mg per serving
Conclusion
The Red Velvet Cheesecake is a truly exceptional dessert that offers a delightful balance of flavors and textures. Its stunning appearance and decadent taste make it a perfect choice for any special occasion. With its relatively simple preparation and impressive results, this cheesecake is sure to become a favorite in your baking repertoire. Enjoy the experience of creating this masterpiece and savor every bite!
5 Questions and Answers About This Recipe
Q1: Can I make this cheesecake ahead of time?
A: Absolutely! In fact, it’s recommended. The cheesecake needs at least 6 hours to set in the refrigerator, but it can be made a day or two in advance. Just store it covered in the refrigerator until you’re ready to serve. Add the whipped cream topping just before serving to prevent it from deflating.
Q2: Can I use a different type of cookie for the base?
A: Yes, you can substitute the Oreo cookies with another type of chocolate cookie, graham crackers, or even digestive biscuits. Just make sure to adjust the amount of melted butter accordingly to achieve the right consistency for the base.
Q3: What can I use instead of gelatine?
A: If you prefer not to use gelatine, you can try using agar-agar as a vegetarian alternative. However, agar-agar can be a bit tricky to work with, so be sure to follow the package instructions carefully. You may also need to adjust the amount used to achieve the desired consistency. Another option is to bake the cheesecake.
Q4: Can I freeze this cheesecake?
A: Yes, you can freeze the cheesecake, but it’s best to do so before adding the whipped cream topping. Wrap the cheesecake tightly in plastic wrap and then in foil. Freeze for up to 2-3 months. Thaw in the refrigerator overnight before serving. Add the whipped cream topping after thawing.
Q5: What can I do if my cheesecake cracks on top?
A: Cracking can sometimes happen when cheesecake cools too quickly. To prevent this, try cooling the cheesecake slowly in the oven with the door slightly ajar after it has set in the fridge. If cracks do appear, don’t worry! The whipped cream topping will cover them up nicely. You can also try placing the cheesecake in a water bath while baking to maintain even moisture and prevent cracking.