Description of this recipe
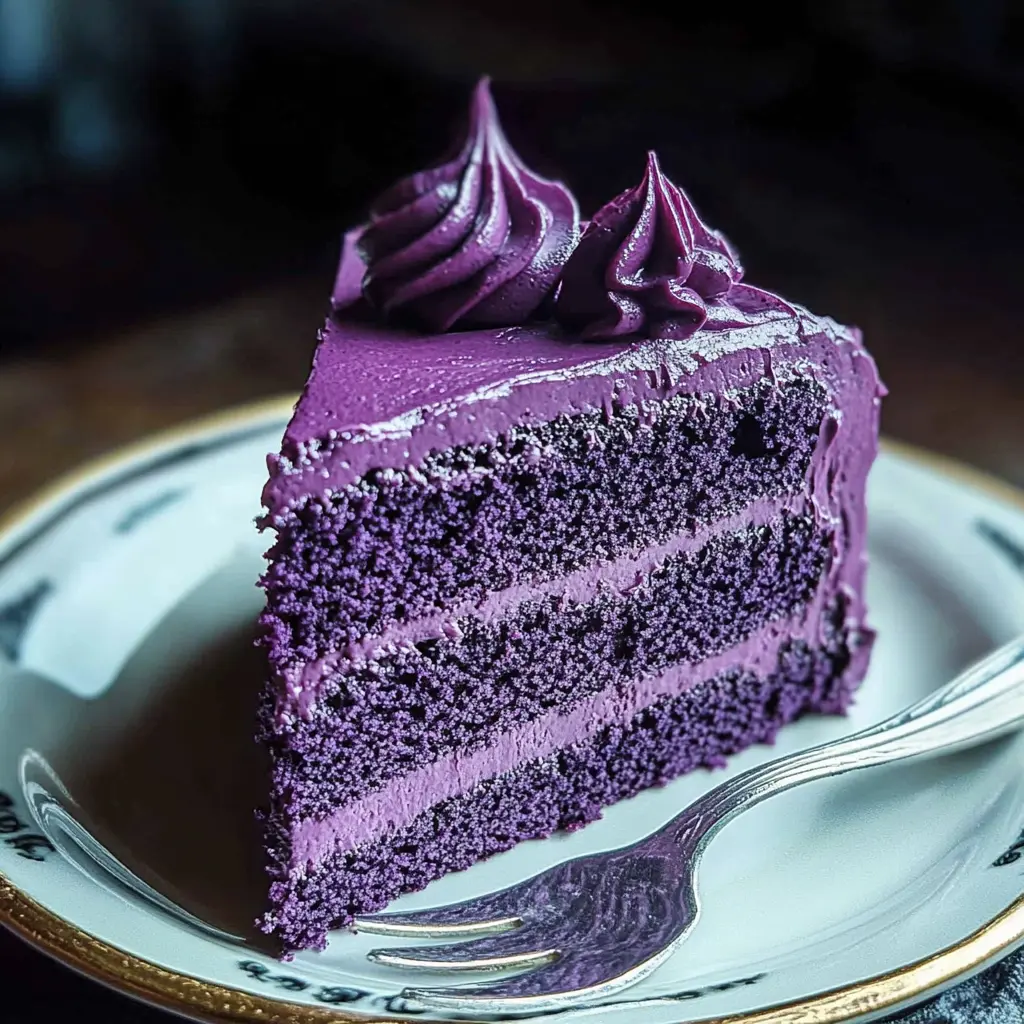
The Royal Purple Velvet Cake is a stunning and delectable dessert that’s perfect for special occasions, celebrations, or whenever you want to impress. This cake combines the classic, tender crumb of a velvet cake with a vibrant, eye-catching purple hue, making it a feast for both the eyes and the palate. The rich, subtle chocolate notes complement the smooth, creamy vanilla frosting, creating a harmonious balance of flavors and textures that will leave everyone craving for more.
Why you will love this recipe
You’ll fall in love with the Royal Purple Velvet Cake for several reasons. First and foremost, its striking appearance is sure to captivate. The deep purple color adds a touch of elegance and whimsy, making it a memorable centerpiece for any event. Beyond its looks, this cake boasts a moist, tender crumb that melts in your mouth. The hint of cocoa powder enhances the flavor without overpowering the delicate balance. The creamy vanilla frosting is the perfect complement, providing a smooth, sweet finish that ties everything together. Plus, the recipe is straightforward and easy to follow, ensuring a successful bake every time. It is more than just a cake; it’s an experience that combines visual appeal, delicious taste, and a sense of accomplishment.
Introduction
Velvet cakes have long been cherished for their soft, tender texture and delicate flavor. The Royal Purple Velvet Cake takes this classic dessert to new heights by infusing it with a vibrant purple color that’s both visually stunning and delightfully unexpected. This recipe combines the traditional elements of a velvet cake with modern flair, making it perfect for any occasion.
The secret to a great velvet cake lies in the buttermilk, which tenderizes the gluten in the flour, resulting in a fine, velvety crumb. The addition of vinegar helps to activate the baking soda, creating a light and airy texture. Cocoa powder adds a subtle chocolate flavor that complements the vanilla frosting perfectly. The purple food coloring transforms the cake into a show-stopping masterpiece.
Whether you’re baking for a birthday, anniversary, holiday, or just because, the Royal Purple Velvet Cake is sure to impress. Its unique color and delicious flavor will make it the star of any dessert table. Follow this recipe, and you’ll create a cake that’s not only beautiful but also incredibly delicious.
Ingredients:
For the Cake:
- 2 ½ cups all-purpose flour
- 1 ½ cups granulated sugar
- 1 tsp baking powder
- 1 tsp baking soda
- ½ tsp salt
- 1 cup buttermilk, room temperature
- 1 cup vegetable oil
- 2 large eggs, room temperature
- 2 tsp vanilla extract
- 2 tbsp cocoa powder
- 1 oz purple food coloring (gel recommended)
- 1 tsp white vinegar
For the Creamy Vanilla Frosting:
- 1 cup unsalted butter, softened
- 4 cups powdered sugar
- 2 tsp vanilla extract
- 2–3 tbsp heavy cream
Preparation:
- Step 1: Preheat oven to 350°F (175°C). Grease and flour two 8-inch round cake pans. This ensures that the cakes will release easily after baking. Applying both grease and flour provides extra insurance against sticking.
- Step 2: In a large bowl, sift together flour, sugar, baking powder, baking soda, salt, and cocoa powder. Sifting ensures that there are no lumps in the dry ingredients and that they are evenly distributed, contributing to a smoother batter and more consistent texture.
- Step 3: In a separate bowl, whisk together buttermilk, oil, eggs, vanilla extract, purple food coloring, and vinegar. Whisking the wet ingredients separately ensures they are fully combined before being added to the dry ingredients, preventing overmixing.
- Step 4: Gradually add the wet ingredients to the dry ingredients, mixing until just combined. Do not overmix. Overmixing can develop the gluten in the flour, resulting in a tough cake. Mix only until the wet and dry ingredients are just incorporated.
- Step 5: Divide the batter evenly between the prepared pans and smooth the tops. Equal distribution of batter ensures that both cake layers bake at the same rate and to the same height, making for a more uniform and visually appealing final product.
- Step 6: Bake for 28–32 minutes, or until a toothpick inserted into the center comes out clean. Baking time can vary depending on your oven. Start checking for doneness at 28 minutes. A clean toothpick indicates that the cake is fully baked.
- Step 7: Allow cakes to cool in pans for 10 minutes, then turn out onto a wire rack to cool completely. Cooling the cakes in the pans briefly allows them to firm up slightly, making them easier to handle. Ensure the cakes are completely cool before frosting to prevent the frosting from melting.
- Step 8: For the frosting: Beat butter until creamy. Gradually add powdered sugar, one cup at a time, beating well after each addition. Add vanilla extract and enough heavy cream to reach desired consistency. Beating the butter until creamy creates a smooth base for the frosting. Adding the powdered sugar gradually prevents it from flying everywhere.
- Step 9: Frost the completely cooled cakes, stacking one on top of the other and covering the sides with the creamy vanilla frosting. Ensure the cakes are level before frosting to create a stable and even cake.
- Step 10: Decorate as desired — think edible glitter, purple sprinkles, or delicate piping for an extra elegant finish. Get creative with your decorations to personalize your cake.
COOKING Rating:
- Difficulty: Medium
- Flavor: Rich, subtly chocolatey, creamy, and sweet
- Texture: Moist, tender, and velvety
Serving Suggestions:
The Royal Purple Velvet Cake is a versatile dessert that can be served in a variety of ways. Here are a few suggestions:
- Serve slices of cake with a scoop of vanilla ice cream or a dollop of whipped cream.
- Pair with fresh berries, such as raspberries or blueberries, to add a touch of tartness.
- Drizzle with a chocolate or raspberry sauce for an extra layer of flavor.
- Serve alongside a cup of coffee or tea for a delightful afternoon treat.
- Garnish with edible flowers for an elegant presentation.
Tips:
- Use gel food coloring for the most vibrant purple color. Liquid food coloring may not provide the same intensity and can alter the batter consistency.
- Ensure all ingredients are at room temperature for better emulsification and a smoother batter.
- Do not overmix the batter, as this can result in a tough cake.
- Cool the cakes completely before frosting to prevent the frosting from melting.
- If the frosting is too thick, add a little more heavy cream until you reach the desired consistency.
- For a more intense chocolate flavor, add an extra tablespoon of cocoa powder to the batter.
- Store leftover cake in an airtight container in the refrigerator for up to three days.
Prep Time:
- 25 minutes
Cook Time:
- 28-32 minutes
Total Time:
- Approximately 1 hour (excluding cooling time)
Nutritional Information:
- Note: Nutritional information is an estimate and can vary based on specific ingredients and serving sizes.
- Calories: Approximately 450-500 per slice
- Protein: Approximately 5-7 grams per slice
- Sodium: Approximately 200-250 mg per slice
Conclusion
The Royal Purple Velvet Cake is a stunning and delicious dessert that is sure to impress. Its vibrant color, moist texture, and creamy vanilla frosting make it a perfect choice for any special occasion. Whether you’re celebrating a birthday, anniversary, or just want to bake something beautiful, this cake is a guaranteed crowd-pleaser. With its straightforward recipe and easy-to-follow instructions, you’ll be able to create a cake that’s not only visually appealing but also incredibly delicious. So gather your ingredients, preheat your oven, and get ready to bake a cake that’s fit for royalty.
Questions and Answers about this recipe:
Q1: Can I use a different type of food coloring?
A: While gel food coloring is highly recommended for achieving the most vibrant purple color, you can use liquid food coloring if that’s what you have on hand. However, be aware that liquid food coloring may not provide the same intensity, and you may need to use more to achieve the desired hue. Additionally, adding too much liquid food coloring can alter the consistency of the batter, so use it sparingly and adjust accordingly. If possible, invest in gel food coloring for the best results.
Q2: What can I use if I don’t have buttermilk?
A: If you don’t have buttermilk on hand, you can easily make a substitute. Simply add one tablespoon of white vinegar or lemon juice to a liquid measuring cup, then fill the cup with milk until it reaches the one-cup mark. Stir gently and let it sit for about 5-10 minutes. The milk will curdle slightly, mimicking the acidity and texture of buttermilk. This substitute works well in most recipes that call for buttermilk, including this Royal Purple Velvet Cake.
Q3: Can I make this cake ahead of time?
A: Yes, you can definitely make this cake ahead of time. The cake layers can be baked, cooled, and wrapped tightly in plastic wrap, then stored at room temperature for up to two days or in the refrigerator for up to five days. You can also freeze the cake layers for longer storage. Just make sure they are well-wrapped to prevent freezer burn. When you’re ready to assemble the cake, simply thaw the layers (if frozen), prepare the frosting, and frost as directed. Frosting can also be made a day in advance and stored in the refrigerator.
Q4: How do I prevent the cake from sticking to the pan?
A: To prevent the cake from sticking to the pan, it’s crucial to properly grease and flour the cake pans. Start by coating the pans with a generous layer of shortening, butter, or cooking spray. Then, sprinkle flour evenly over the greased surface, tapping the pan to ensure the flour coats all areas. Invert the pan and tap out any excess flour. Alternatively, you can use parchment paper rounds in the bottom of the pans for extra insurance. This combination of grease and flour (or parchment paper) will create a barrier between the cake and the pan, allowing the cake to release easily after baking.
Q5: Can I use a stand mixer instead of a hand mixer?
A: Yes, you can absolutely use a stand mixer instead of a hand mixer for this recipe. In fact, a stand mixer can make the process even easier and more efficient. Simply follow the same instructions, but use the stand mixer to mix the ingredients. When creaming the butter and sugar for the frosting, use the paddle attachment. Be sure not to overmix the batter for the cake, regardless of whether you’re using a stand mixer or a hand mixer. Overmixing can lead to a tough cake. Mix until just combined.