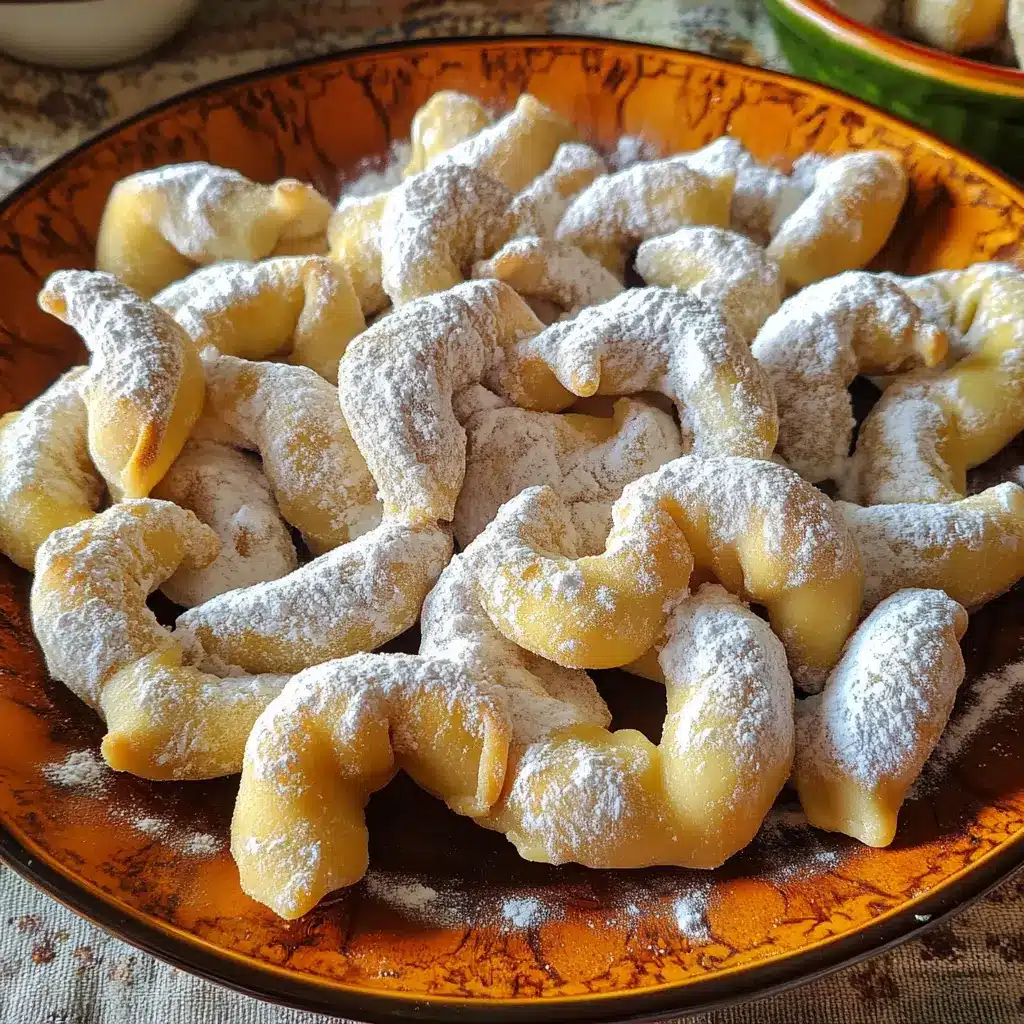
Description: Torcetti are delightful, slightly sweet, and subtly crisp Italian cookies. Characterized by their unique twisted shape and generous coating of confectioners’ sugar, they are a perfect treat to enjoy with coffee, tea, or simply on their own. This recipe captures the essence of traditional Italian baking, resulting in a batch of wonderfully addictive cookies that will impress friends and family alike.
Why You Will Love This Recipe:
- Unique Texture: The combination of butter and shortening creates a tender, slightly crumbly texture that melts in your mouth. The baking process gives them a subtle crispness on the edges, adding to the overall delightful experience.
- Easy to Make: Despite their elegant appearance, Torcetti are surprisingly simple to make. The recipe requires readily available ingredients and straightforward steps, making it accessible even for beginner bakers.
- Versatile: While these cookies are fantastic on their own, they can also be paired with a variety of beverages and desserts. Serve them with a cup of espresso, a glass of Vin Santo, or alongside a scoop of gelato for an authentic Italian experience.
- Visually Appealing: The twisted shape and the generous coating of confectioners’ sugar make these cookies a beautiful addition to any dessert platter or gift basket. They are sure to catch the eye and spark curiosity.
- Perfect for Sharing: This recipe yields a generous batch of cookies, making it perfect for sharing with loved ones or bringing to parties and gatherings. They are always a crowd-pleaser.
Introduction
Baking is a journey that takes us to different places and cultures. Today, we are embarking on a culinary adventure to Italy, the land of art, passion, and unforgettable food. Our destination is the creation of Torcetti, also known as “little twists”.
Torcetti are more than just cookies; they’re a testament to the beauty of simplicity. Born from humble ingredients and shaped with love, each bite transports you to an Italian pasticceria, filling you with warmth and joy. These delicate cookies are a staple in many Italian households, often enjoyed during special occasions or as an everyday treat. Their distinctive twisted shape and snowy coating of confectioners’ sugar add a touch of elegance to any table.
In this recipe, we’ll explore the secrets to making perfect Torcetti every time. We’ll guide you through each step, from preparing the dough to shaping the cookies and baking them to golden perfection. Whether you’re an experienced baker or just starting out, you’ll find this recipe easy to follow and incredibly rewarding.
So, gather your ingredients, put on your favorite Italian tunes, and let’s get baking! Prepare to fill your kitchen with the irresistible aroma of freshly baked Torcetti and create memories that will last a lifetime.
Ingredients:
- 5 cups all-purpose flour
- 1 cup (2 sticks) cold unsalted butter, cubed
- 1 cup vegetable shortening
- 1 package (1/4 ounce, about 2 1/4 teaspoons) active dry yeast
- 1/2 cup 2% warm milk (110° to 115°F)
- 2 large eggs, room temperature
- 1 tablespoon granulated sugar
- 1-1/2 teaspoons vanilla extract
- 2 cups confectioners’ sugar, plus additional for coating
Preparation:
Step 1: Prepare the Dough
In a large bowl, combine the all-purpose flour. Cut in the cold butter and shortening using a pastry blender or your fingertips until the mixture resembles coarse crumbs. This step is crucial for creating the flaky, tender texture of the cookies. Make sure the butter and shortening are cold, as this will prevent them from melting and ensure the dough doesn’t become greasy.
Step 2: Activate the Yeast
In a separate large bowl, dissolve the active dry yeast in warm milk. The milk should be warm but not hot, as excessive heat can kill the yeast. Add the granulated sugar to the yeast mixture. The sugar provides food for the yeast, helping it to activate and create the carbon dioxide that will make the dough rise. Let the mixture stand for 5-10 minutes, or until it becomes foamy. This indicates that the yeast is active and ready to use.
Step 3: Combine Wet and Dry Ingredients
Add the room-temperature eggs and vanilla extract to the yeast mixture. Beat until well combined. Gradually add 2 cups of the flour-butter mixture to the wet ingredients, beating until well blended. Then, gradually beat in the remaining crumb mixture.
Step 4: Knead the Dough
Turn the dough onto a lightly floured surface. Knead for 3-4 minutes, or until the dough becomes smooth and elastic. Kneading helps develop the gluten in the flour, which gives the cookies their structure. Be careful not to over-knead the dough, as this can make the cookies tough.
Step 5: Let the Dough Rise
Place the dough in a greased bowl, turning once to grease the top. This will prevent the dough from drying out as it rises. Cover the bowl with a clean kitchen towel or plastic wrap. Let the dough rise in a warm place until doubled in size, about 1 hour. This allows the yeast to work its magic, creating a light and airy dough.
Step 6: Shape the Torcetti
Punch the dough down to release the air. Divide the dough into 6 equal portions. Shape each portion into twelve 6-inch ropes, approximately 1/4 inch thick. Roll each rope in confectioners’ sugar, ensuring it’s evenly coated. This will give the cookies their signature snowy appearance.
Step 7: Twist and Shape
Shape each rope into a loop. Holding both ends of the loop, twist them together 3 times. This creates the characteristic twisted shape of the Torcetti. Be gentle when twisting the dough to prevent it from tearing.
Step 8: Arrange on Baking Sheets
Place the twisted cookies 2 inches apart on greased baking sheets. This allows for proper air circulation during baking and prevents the cookies from sticking together.
Step 9: Bake the Cookies
Bake in a preheated oven at 375°F (190°C) for 12-14 minutes, or until the cookies are golden brown. Keep a close eye on them during the last few minutes of baking to prevent them from burning.
Step 10: Coat with Confectioners’ Sugar
While the cookies are still warm, roll them in additional confectioners’ sugar. This will create a thick, sweet coating that complements the delicate flavor of the cookies.
Step 11: Cool and Enjoy
Cool the Torcetti completely on wire racks before serving. This allows them to crisp up and prevents them from becoming soggy.
COOKING Rating:
- Difficulty: Intermediate
- Taste: Sweet and Buttery
- Texture: Slightly Crisp, Tender, and Crumbly
Serving Suggestions:
- Serve with a cup of hot espresso or cappuccino.
- Pair with a glass of Vin Santo for a traditional Italian dessert pairing.
- Offer alongside a scoop of gelato or sorbet.
- Include in a dessert platter with other Italian cookies and pastries.
- Package in a decorative tin as a thoughtful homemade gift.
Tips:
- Use high-quality butter and shortening for the best flavor and texture.
- Ensure the yeast is fresh and active for optimal rising.
- Do not over-knead the dough, as this can make the cookies tough.
- Roll the cookies in confectioners’ sugar while they are still warm for better adhesion.
- Store the cooled cookies in an airtight container at room temperature for up to 5 days.
Prep Time:
- 30 minutes
Cook Time:
- 12-14 minutes
Total Time:
- Approximately 2 hours (including rising time)
Nutritional Information: (Estimate per cookie)
- Calories: Approximately 150-180 kcal
- Protein: 2-3g
- Sodium: 20-30mg (depending on the salt content of the butter)
Conclusion
Congratulations! You have successfully created a batch of delicious, authentic Torcetti. These twisted delights are a true representation of Italian baking at its finest. The combination of simple ingredients, careful preparation, and a touch of love results in a cookie that is both elegant and comforting.
Whether you are sharing them with friends and family, enjoying them with a cup of coffee, or simply savoring them on your own, these Torcetti are sure to bring a smile to your face. We hope this recipe inspires you to continue exploring the wonderful world of baking and to discover new culinary adventures. Buon appetito!
Questions and Answers About This Recipe:
Q1: Can I use all butter instead of a combination of butter and shortening?
A: Yes, you can use all butter. However, using a combination of butter and shortening contributes to the cookies’ unique texture. Butter provides flavor, while shortening contributes to tenderness. If you use all butter, the cookies may be slightly denser and less crumbly.
Q2: What if my yeast doesn’t foam when I add it to the warm milk and sugar?
A: If your yeast doesn’t foam, it’s likely that the yeast is either expired or the milk was too hot or too cold. Try using a fresh package of yeast and ensure the milk is between 110° to 115°F (43° to 46°C). If the yeast still doesn’t activate, it’s best to start over with a new batch to ensure the cookies rise properly.
Q3: Can I freeze the dough for later use?
A: Yes, you can freeze the dough. After kneading, place the dough in a greased bowl, cover it tightly with plastic wrap, and then freeze for up to 2 months. When ready to use, thaw the dough in the refrigerator overnight. Allow the dough to come to room temperature before shaping and baking.
Q4: My Torcetti are spreading too much during baking. What am I doing wrong?
A: If your Torcetti are spreading too much, it could be due to a few factors. First, make sure your butter and shortening are cold when you cut them into the flour. Second, avoid over-kneading the dough, as this can develop too much gluten and cause the cookies to spread. Finally, ensure your oven temperature is accurate and that you are not using a baking sheet that is too hot.
Q5: Can I add other flavorings to the dough?
A: Absolutely! Feel free to experiment with other flavorings to customize your Torcetti. Some popular additions include lemon zest, almond extract, anise extract, or a pinch of cinnamon. Add these flavorings along with the vanilla extract for a delicious twist on the classic recipe.